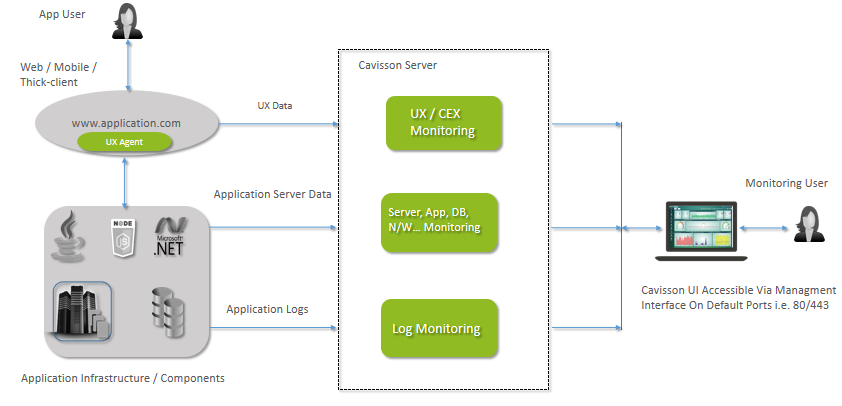
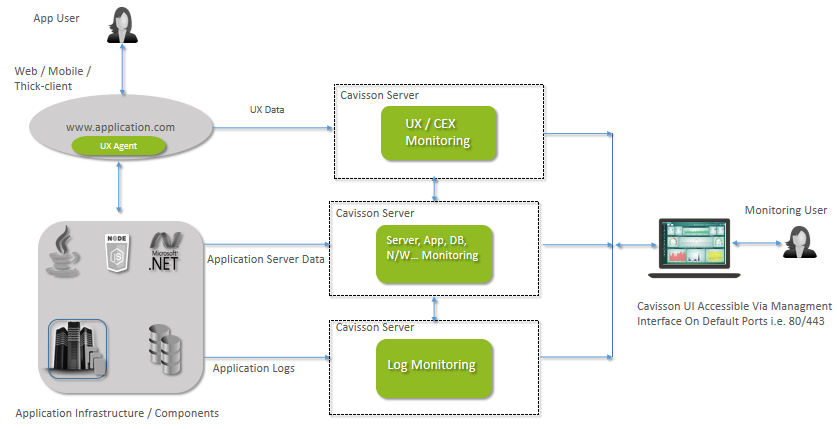
Overview
Cavisson monitoring suite modules can be installed on a single node (Machine/VM) or on multiple nodes (Machines/VMs). This document provides pre-requisites and SOPs for installation and configuration of Cavisson monitoring suite & its different monitoring modules i.e. NetDiagnostics (ND), NetVision (NV), and NetForest (NF) using “CavissonServerInstaller.<4.7.1.build number>.tar.gz“.
There are two cases for the installation:
Single Node Installation: When all three components (ND, NV & NF) are installed on a single machine
Installation on Multiple Nodes :-When all three components (ND, NV & NF) are installed on separate machines.
Pre-requisites
- Root user privilege as the installer needs to be run by the root user.
Note: ‘Root’ user will be needed only for the installation. A ‘Cavisson’ user will be created during the installation and all the services will run with the ‘Cavisson’ user only.
- Supported Operating Systems: Ubuntu16.04.2,Ubuntu16.04.6, Ubuntu20.04.2, CentOS7.*, RHEL7.*
- You should have access to Cavisson Build Repository to download the installers & builds.
- Node/machine should have two IP addresses i.e. 1 management and 1 external.
To get IP’s reach out cavisson Networking Team.
Installation Steps
Installer will check if CavBin is already installed or not. If it is installed, then it will start configuring the modules given in the inputs, under the configuration mode. If CavBin is not found, the installer will proceed with complete CavBin installation
- Downloading and storing the Cavisson server Installer files.
- Follow Single Node/Multi Node Installation Process.
- Verify Logs for Error Messages
- Verify Successful Installation
- Advance Operations
Downloading and storing the Cavisson server Installer files.
- Login by Root User.
Command: –sudo su
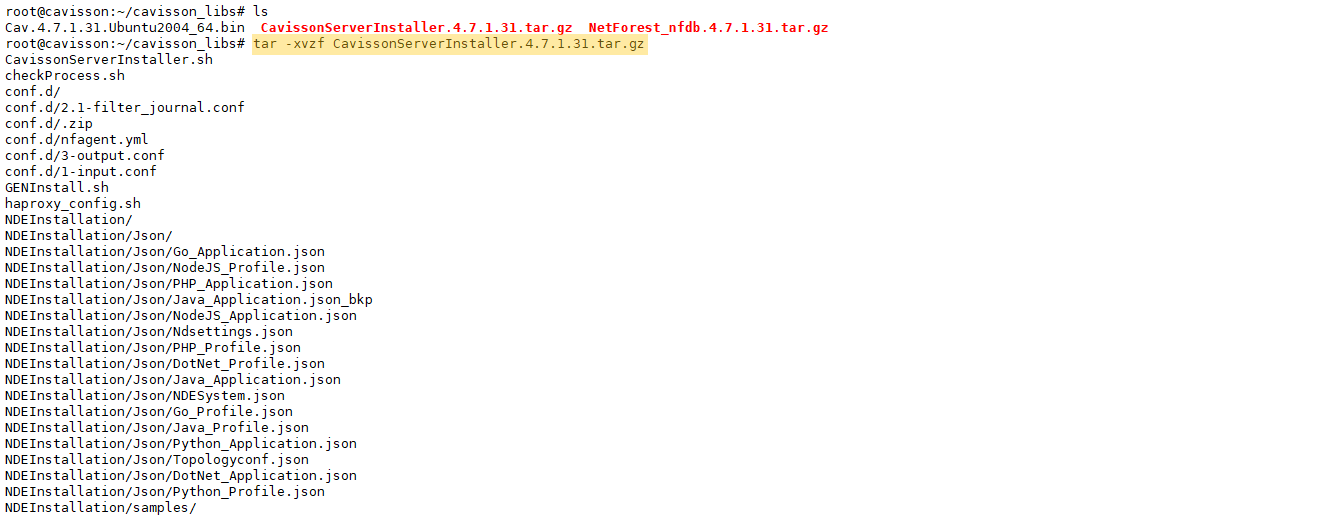
- Go to the root folder and create the cavisson_libs folder.
- To Create the following directory in the Root folder:
Command: –mkdir cavisson_libs
- Once created, execute the following command to copy the files in cd /root/cavisson_libs directory.
Info:-Get in touch with a Cavisson representative to get the link from which you can download these files. |
- Download Unified server Installer
Unified server Installer is a script designed to automate the installation and configuration of Cavisson’s products. With OneClick Installer, users can perform installation operations up to three times faster than before as well as be sure that products will be installed in the recommended order.
Ex:- wget http://10.10.30.16:8992/others/SERVER-INSTALLER/CavissonServerInstaller.4.7.1.31.tar.gz

6. Download Cavisson Server Build
Cavisson CavBin is a platform for setting the environment for various cavisson products. It Include all server dependencies, Integrations, libraries, utilities etc. which are required to run the cavisson products.
Ex:- wget http://10.10.30.16:8992/others/CAVBIN/Cav.4.7.1.31.Ubuntu2004_64.bin

7. Untar the installer, at the same path, using the following command in this path “</root/cavisson_libs/”
Command:- “tar -xvzf CavissonServerInstaller-4.7.1.31.tar.gz”.
8. Provide executable permission to the CavissonServerInstaller.sh file: chmod +x CavissonServerInstaller.sh
Choose which Installation is Required Single Node or Multi Node and Choose the steps accordingly.
Single node:- When unified products are installed on a single machine.
Multi node:- When unified products are installed on separate machines.
Installation on Single Node
You have the option to download all three sub-modules of our APM solution i.e. application monitoring (NDE), user monitoring (NV) and log monitoring (NF). The installer works by specifying the Module parameter that needs to be installed and depending upon your license, you can choose the relevant option. For e.g. if you have bought the license for all three modules, you can simply pass ND, NV,NF in the Module parameter. In case you have bought only ND & NF, you can pass Module=ND, NF. Do note that by default i.e. if you do not pass any value to the Module parameter, all three modules (ND, NV & NF) are installed.
Depending upon the type of application that you want to monitor i.e. JAVA, PHP, NodeJS, Python, specify the Agent-Type. Do note that by default, the installer assumes the agent type as JAVA. Sample commands are given below for your perusal along with possible combinations of product installation (ND+NV+NF, ND Only, ND+NV, ND+NF and with different application types):
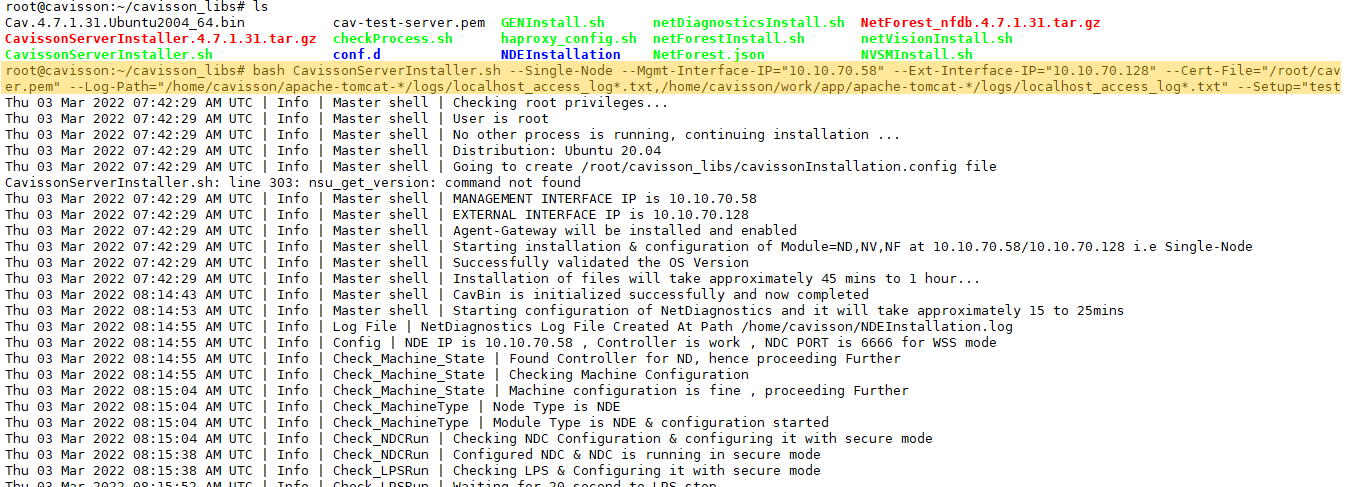
Case 1. If All modules need to be installed (ND,NV,NF) with default Application agent i.e Java < bash CavissonServerInstaller.sh –Single-Node –Module=”ND,NV,NF” –Mgmt-Interface-IP=”Provide Management Interface IP” –Ext-Interface-IP=”Provide Internet Enabled External Interface IP” –Cert-File=”Provide SSL certificate path with file name in .pem format like /root/cavisson_libs/cav-test-server.pem” –Log-Path=”Provide server logs paths like /tmp/nf.log1, /tmp/nf.log2, /tmp/nf.log3″ –Setup=”testenv” –Tier=”business” >
Case 2. If All modules to be installed(ND,NV,NF) with Application agent PHP < bash CavissonServerInstaller.sh –Single-Node –Module=”ND,NV,NF” –Mgmt-Interface-IP=”Provide Management Interface IP” –Ext-Interface-IP=”Provide Internet Enable External Interface IP” –Agent-Type=”PHP” –Cert_File=”Provide SSL certificate path with file name in .pem format like /root/cavisson_libs/cav-test-server.pem”, –Log-Path=”Provide server logs paths like /tmp/nf.log1, /tmp/nf.log2, /tmp/nf.log3 ” >
Case 3. If only ND modules to be installed with Application agent PHP (Follow the same command with a changed module in case you want to install only NV or only NF) < bash CavissonServerInstaller.sh –Single-Node –Module=”ND” –Mgmt-Interface-IP=”Provide Management Interface IP” –Ext-Interface-IP=”Provide Internet Enable External Interface IP” –Agent-Type=”PHP” –Cert-File=”Provide SSL certificate path with file
name in .pem format like /root/cavisson_libs/cav-test-server.pem” –Setup=”testenv” >
< bash CavissonServerInstaller.sh –Single-Node –Module=”NV,NF” –Mgmt-Interface-IP=”Provide Management Interface IP” –Ext-Interface-IP=”Provide Internet Enable External Interface IP” –Agent-Type=”PHP” –Cert-File=”Provide SSL certificate path with file name in .pem format like /root/cavisson_libs/cav-test-server.pem” –Setup=”testenv” >
< bash CavissonServerInstaller.sh –Single-Node –Module=”ND” –Sub-Module=”NVSM” —Mgmt-Interface-IP=”Provide Management Interface IP” –Ext-Interface-IP=”Provide Internet Enable External Interface IP” –Cert-File=”Provide SSL certificate path with file name in .pem format” –Log-Path=”Provide comma separated list server logs” –Setup=”testenv” –Tier=”business” >
Case 6. If NVSM Generator is to be installed < bash CavissonServerInstaller.sh –Single-Node –Module=”NS” –Sub-Module=”GENERATOR” –NVSM-Controller-IP=”Provide NVSM Controller IP” —Mgmt-Interface-IP=”Provide Management Interface IP” –Ext-Interface-IP=”Provide Internet Enable External Interface IP” –Cert-File=”Provide SSL certificate path with file name in .pem format” –Log-Path=”Provide comma separated list server logs” –Setup=”testenv” –Tier=”business” > Case 7. If NVSM Controller and Generator both are to be installed < bash CavissonServerInstaller.sh –Single-Node –time-zone=”Provide TimeZone” –hostname=”Provide HostName” –Brand=”true” –Module=”ND” –Sub-Module=”NVSM, Generator”-Mgmt-Interface-IP=”Provide Management Interface IP” –Ext-Interface-IP=”Provide Internet Enable External Interface IP” –Log-Path=”Provide comma separated list server logs” –Setup=”testenv” –Tier=”business”> Case 8. If module NS/NO as a Controller is to be installed < bash CavissonServerInstaller.sh –Single-Node –time-zone=”Provide TimeZone” –hostname=”Provide HostName” –Brand=”true” –Module=”NS” –Mgmt-Interface-IP=”Provide Management Interface IP” –Ext-Interface-IP=”Provide Internet Enable External Interface IP” –Log-Path=”Provide comma separated list server logs” –Setup=”testenv” –Tier=”business”> Case 9. If module NO as a Controller is to be installed < bash CavissonServerInstaller.sh –Single-Node –time-zone=”Provide TimeZone” –hostname=”Provide HostName” –Brand=”true” –Module=”NO” –Mgmt-Interface-IP=”Provide Management Interface IP” –Ext-Interface-IP=”Provide Internet Enable External Interface IP” –Log-Path=”Provide comma separated list server logs” –Setup=”testenv” –Tier=”business”> |
Example of Single Node:-
All modules to be installed (ND, NV, NF) with JAVA agent:
Controller Details – What are controllers, which is the master controller in case of setting up of multiple products.
Installation On Multi Node: –
As explained earlier, multi-node installation entails that you are installing different modules (NV, ND, NF) on different nodes/machines/server. Do note that in case of multi node installation
ND on Node 1 < bash CavissonServerInstaller.sh –Multi-Node –Module=”ND” –Mgmt-Interface-IP=”Provide Management Interface IP” –Ext-Interface-IP=”Provide Internet Enable External Interface IP” –NV-Mgmt-Interface-IP=”Provide Management Interface IP of NV” –NV-Ext-Interface-IP=”Provide Internet Enable External Interface IP of node where nv module is install” –NF-Mgmt-Interface-IP=”Provide Management Interface IP of NF” –Cert-File=”Provide SSL certificate path with file name in .pem format like /root/cavisson_libs/cav-test-server.pem” –Setup=”testenv” >
NV on Node 2 < bash CavissonServerInstaller.sh –Multi-Node –Module=”NV” –Mgmt-Interface-IP=”Provide Management Interface IP” –Ext-Interface-IP=”Provide Internet Enable External Interface IP” –ND-Mgmt-Interface-IP=”Provide Management Interface IP of ND” –NF-Mgmt-Interface-IP=”Provide Management Interface IP of NF” –Cert-File=”Provide SSL certificate path with file name in .pem format like /root/cavisson_libs/cav-test-server.pem”>
NF on Node 3 < bash CavissonServerInstaller.sh –Multi-Node –Module=”NF” –Mgmt-Interface-IP=”Provide Management Interface IP” –Ext-Interface-IP=”Provide Internet Enable External Interface IP” –NV-Mgmt-Interface-IP=”Provide Management Interface IP of NV” –ND-Mgmt-Interface-IP=”Provide Management Interface IP of ND” –Cert-File=”Provide SSL certificate path with file name in .pem format like /root/cavisson_libs/cav-test-server.pem”, –Log-Path=””Provide server logs paths like /tmp/nf.log1, /tmp/nf.log2, /tmp/nf.log3″ –Setup=”testenv” –Tier=”business”> |
Example of Multi Node: –
< bash CavissonServerInstaller.sh –Multi-Node –Module=”NF” –MgmtInterfaceIP=”Provide Management Interface IP” –ExtInterfaceIP=”Provide Internet Enable External Interface IP” –NV-Mgmt-Interface-IP=”Provide Management Interface IP of NV” –NF-Mgmt-Interface-IP=”Provide Management Interface IP of NF” –Cert_File=”Provide SSL certificate path with file name in .pem format” –Log-Path=”Provide server log path” >
Verifying Cavisson Server Installation
Verify Logs for Error Messages
To view logs pertaining to server installer go to the following location:
/root/cavisson_libs/logs/cavisson_all_modules_installer.log

All Info and error related logs during the process of server installation will be found in the above mentioned location.
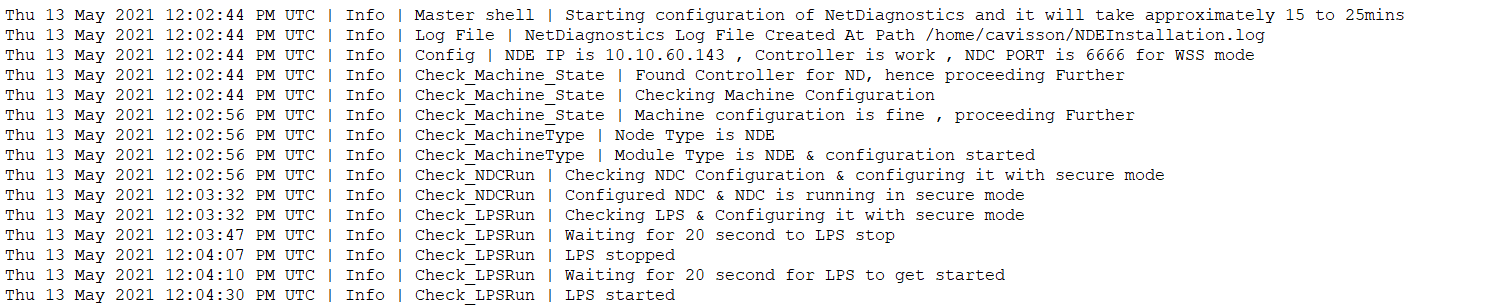
ND Logs: Verify ND Module logs for verification of ND installation in log file at the below path.
Log Path: /home/cavisson/NDEInstallation.log
NV Logs: Verify NV Module logs for verification of NV installation in log file at the below path.
Log Path: /home/cavisson/nvinstalllog-<year>-<month>-<date>.log

NF Logs: Verify NF Module logs for verification of NF installation in log file at the below path.
Log Path: /home/cavisson/NFInstallation.log


GUI URLs are available in log file at path <root/cavisson_libs/>
- Name of File: txt

2. Copy URL “Unified URL” from txt. Open in Chrome browser. Login with “Cavisson” or “Guest” user.

This completes the installation of Cavisson servers.
Controller Verification:-

Uninstallation Steps
If there is any issue observed during installation and that needs re-installation.
Follow below steps to remove packages installed:
- root@ubuntu:/home/cavisson# ls
- Remove /tmp/lock
- rm -rf apps etc thirdparty users work
if any other file or directory exists, do not remove if re-installation is needed.

Appendix 1 – Advanced Operations
Install NetVision UX Monitoring Agent
UX Monitoring Agent needs to be installed to receive the UX data. Follow the below steps:
- To get the UX data, NetVision Tag must be injected in the application. Please refer to the NV Tag Installation steps.
- Disabled Content security Policy tag in Test application.
- Restart the tomcat of the NV controller if the UI is not opening properly. It happens due to the node process being restarted multiple times.
- Added a keyword in case CORS errors show up for data calls on the browser. To do it, follow the below steps:
- Navigate to /home/cavisson/Controller_NV/hpd/rum/config/rum.conf
- Add keyword NV_CORS_ORIGIN <Origin>
Example: NV_CORS_ORIGIN http://10.10.60.233:8888
Change in Log-Path for Log Agent
If Log paths were not correct during the Cavisson Server installation, follow the below steps to update the same:
Note: 1–input.conf and 3-output.conf file are present at /root/cavisson_libs/conf.d
- Change in conf file. Specify the log path using keyword path => “full log path with log file name”
Sample
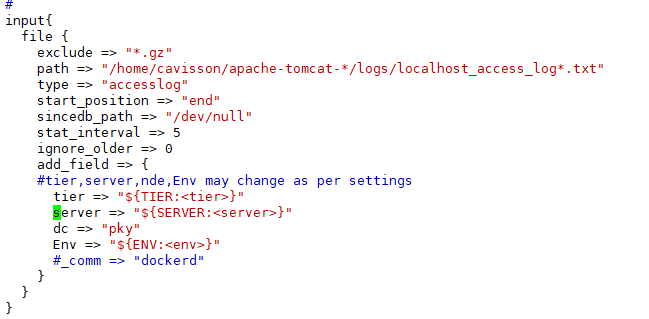
2. In case of Multiple log paths this file contains multiple file {} block. Similarly do changes in path for blocks.
3. Check whether 3-output.conf file host keyword assign with Agent-Gateway Url (external ip) and Dump the changed configuration to NetForest database using utilities.sh file present in $NETFOREST BASE HOME DIR$/tools
Note: The user can fetch “NETFOREST BASE HOME DIR” by running command ps -ef |grep nfdb

- Run the following command from $NETFOREST BASE HOME DIR$/tools to dump config.
Note: Please change <env> with the current setup name, <tier> with the current tier name,<netforest database ip> with netforest database url <Dir path> with config dir path in command.
Syntax: sh utilities.sh -h <netforest database ip > -b /netforest -c <Dir path [Eg: /root/cavisson_libs/conf.d] > -i nfagent_config_<env>_<tier> -dumper
- Restart CMON on the agent server.
Run: /etc/init.d/cmon restart
How to rerun the Continuous Monitoring Test (CMT)?
You need to first stop the test and then restart it by using the below commands:
- Command to stop the test
nsu_stop_test -s <TR No.>
- Command to start the test
nsu_start_test -n <Project>/<Sub-Project>/<Scenario File Name> -S gui -u cavisson -r admin
Appendix 2 – Directory Structure
Modules and their log file paths:
SR No. | Module | Sub-Module | Path/File Name/ Command | Description |
1 | NetDiagnostics | Tomcat | /home/cavisson/<controller>/apps/apache-tomcat-<version>/logs/catalina.out | NetDiagnostics GUI logs |
NDC | /home/cavisson/<controller>//ndc/logs | NetDiagnostics Collector logs | ||
testrun | testrun/tier/partition/nd/logs | Testrun logs | ||
Application logs | application/home logs | Agent Application logs | ||
2 | NetVison | Testrun | /home/cavisson/<controller>//logs | CMT Test Directory |
HPD | /home/cavisson/<controller>/hpd/logs | HPD Logs | ||
3 | NetForest | nfdb | /home/cavisson/netforest/nfdb<version>/logs/nfdb.logs | NetForest Database logs |
nfui | Journalctl -u nfui -f | NetForest GUI logs |
Appendix 3 – Limitations
- NV & NF Modules installation in Single node.
- Manual installation can work on Ubuntu 16.04.7 version and later configuration only runs.
Appendix 4 – Reference Documents
- NetVision Tag Installation Guide
- Cavisson Agent Installation Guide
- Machine Agent, Application Agent & Log Agent need to be installed in application servers or in servers & applications that need to be monitored.
Appendix 5 – Expired License Verification
- The product will be installed with default 28 days validation with no grace period from the day of its installation.
- Once the validity has expired, users can verify the same from the event.log of the current partition of the CMT test. It must be having an error message like below: –
CavErr[1032008]: NetStorm License expired on ‘mm/dd/yyyy’ and the grace period of ‘0’ days is also over. Contact the Cavisson Account Representative (US +1-800-701-6125) to renew your license.
————————————————————————————————————————————
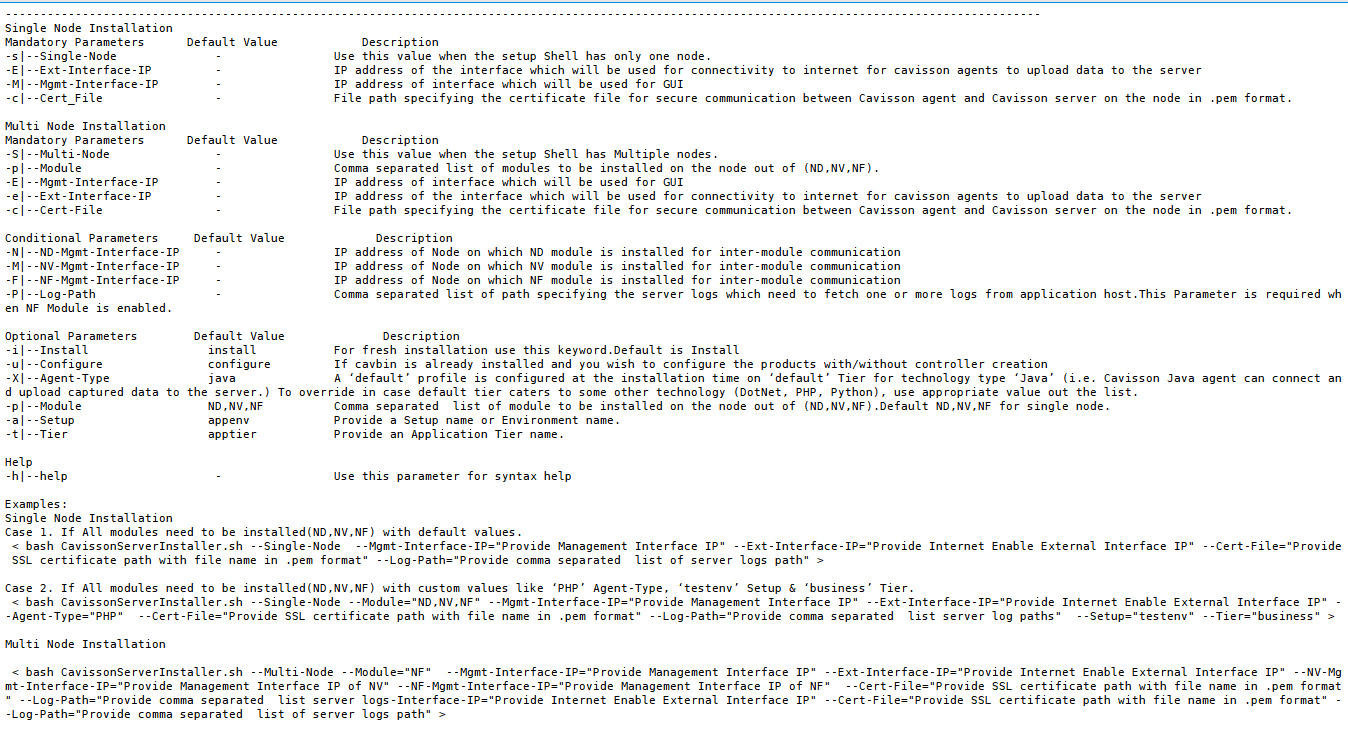
Usage
root@ubuntu:~/cavisson_libs# ./CavissonServerInstaller.sh –help help!!
Single Node Installation
Mandatory Parameters Default Value Description -s|–Single-Node – Use this value when the setup Shell has only one node of interface which will be used for GUI -c|–Cert-File – File path specifying the certificate file for secure communication -E|–Ext-Interface-IP – IP address of the interface which will be used for connectivity to internet for cavisson agents to upload data to the server -M|–Mgmt-Interface-IP – IP address between Cavisson agent and Cavisson server on the node in .pem format. |
Multi-Node Installation
Mandatory Parameters Default Value Description -S|–Multi-Node – Use this value when the setup Shell has Multiple nodes. -p|–Module – Provide any one of the modules to be installed on the node out of (ND,NV,NF). -E|–Mgmt-Interface-IP – IP address of interface which will be used for GUI -e|–Ext-Interface-IP – IP address of the interface which will be used for connectivity to internet for cavisson agents to upload data to the server -c|–Cert-File – File path specifying the certificate file for secure communication between Cavisson agent and Cavisson server on the node in .pem format.
Conditional Parameters Default Value Description -N|–ND-Mgmt-Interface-IP – IP address of Node on which ND module is installed for inter-module communication -M|–NV-Mgmt-Interface-IP – IP address of Node on which NV module is installed for inter-module communication -F|–NF-Mgmt-Interface-IP – IP address of Node on which NF module is installed for inter-module communication -V|–NV-Ext-Interface-IP – IP address of Node on which NV module is installed which will be used for connectivity to internet for UX data upload to the server -P|–Log-Path – Comma separated list of path specifying the server logs which need to fetch one or more logs from the application host.This Parameter is required when NF Module is enabled.
Optional Parameters Default Value Description -i|–Install – For fresh installation use this keyword.Default is install -u|–Configure – Modules will be configured if CavBin is already installed and any module is not configured. -X|–Agent-Type java A ‘default’ profile is configured at the installation time on ‘default’ Tier for technology type ‘Java’ (i.e. Cavisson Java agent can connect and upload captured data to the server.) To override in case default tier caters to some other technologies (DotNet, PHP, Python), use appropriate values out of the list. -p|–Module ND,NV,NF Comma separated list of module to be installed on the node out of (ND,NV,NF). Default ND,NV,NF for single node. -a|–Setup NetD Provide a Setup name or Environment name. -t|–Tier apptier Provide an Application Tier name. -g|–Sub-Module – Provide a Sub-Module, either NVSM or GENERATOR -I|–NVSM-Controller-IP – Provide IP address of NVSM Controller
Help -h|–help – Use this parameter for syntax help |
Examples:
Single Node Installation
Case 1. All modules to be installed (ND, NV, NF) with default values < bash CavissonServerInstaller.sh –Single-Node –Module=”ND,NV,NF” –MgmtInterfaceIP=”Provide Management Interface IP” –ExtInterfaceIP=”Provide Internet Enable External Interface IP” –Cert_File=”Provide SSL certificate path with file name in .pem format” –Log-Path=”Provide server log path” > Case 2. All modules need to be installed (ND, NV, NF) with custom values like ‘PHP’ Agent-Type, ‘testenv’ Setup & ‘business’ Tier < bash CavissonServerInstaller.sh –Single-Node –Module=”ND,NV,NF” –MgmtInterfaceIP=”Provide Management Interface IP” –ExtInterfaceIP=”Provide Internet Enable External Interface IP” –agent-type=”PHP” –Cert_File=”Provide SSL certificate path with file name in .pem format” –Log-Path=”Provide server log path” –Setup=”testenv” –Tier=”business” > |
Multi-Node Installation
< bash CavissonServerInstaller.sh –Multi-Node –Module=”NF” –MgmtInterfaceIP=”Provide Management Interface IP” –ExtInterfaceIP=”Provide Internet Enable External Interface IP” –NV-Mgmt-Interface-IP=”Provide Management Interface IP of NV” –NF-Mgmt-Interface-IP=”Provide Management Interface IP of NF” –Cert_File=”Provide SSL certificate path with file name in .pem format” –Log-Path=”Provide server log path” > |