The unified UI has divided configurations under two different segments wherein all the Service Virtualization level configurations are present in the left panel via the ![]() icon. Once user have logged into the product UI, they need to click on the above mentioned icon to access the Configuration module. Once clicked, they will be redirected to the following screen:
icon. Once user have logged into the product UI, they need to click on the above mentioned icon to access the Configuration module. Once clicked, they will be redirected to the following screen:
Users will be directed to the HTTP Configuration, which is part of the Protocol Settings, as the landing page for configurations. Let us now understand the various protocols supported by Service Virtualization and their details.
Here is the illustration of the icons at the left along with its name.
Icon | Setting |
Static Resource | |
Protocol Settings | |
SSL Configuration | |
Service Time Settings | |
Logging | |
Internet Simulation | |
Advance Settings | |
JMS Settings | |
Connection Fault Settings |
Static Resources
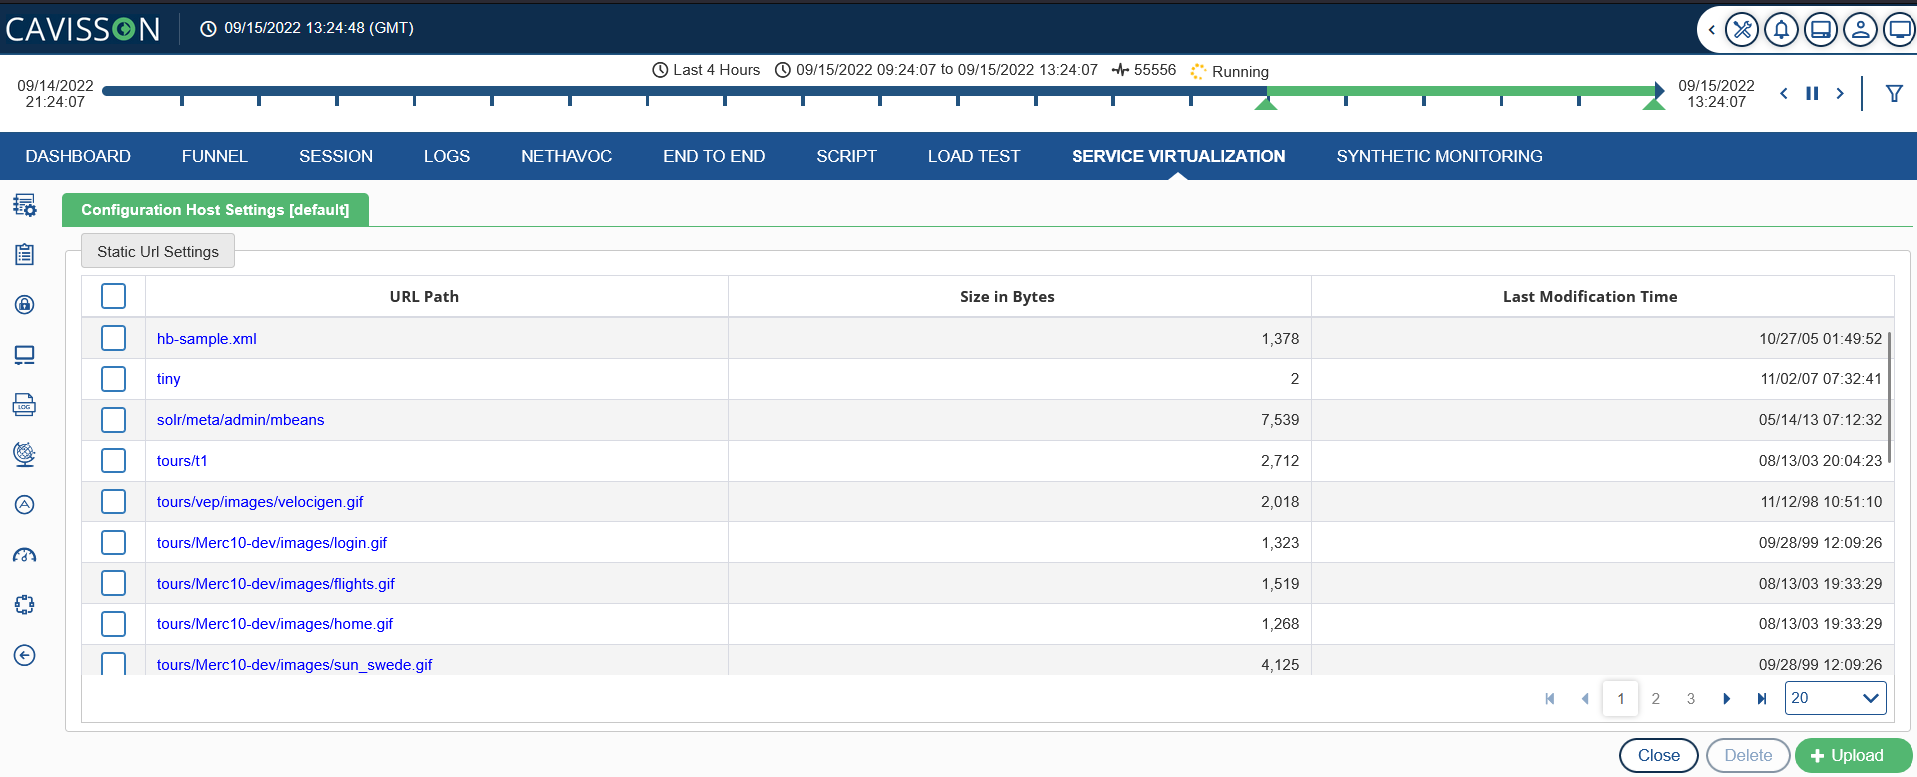
The static resource configuration option gives the ability to add hosts and provide the relevant configurations against these hosts. To access this configuration module, click on the icon. Host configuration privileges control the ability to configure hosts. Click the Static Resources ![]() icon, the following window is displayed:
icon, the following window is displayed:

To add a host, enter the host name under the Add Host field and click on Add button to add the host. Once added, user will able to see the corresponding entry in the Hosts table. To configure the static URLs against an added host, click on the host name (as highlighted in the image above).
Once clicked, user will be redirected to the following screen where they can click on the ![]() button to add html, icon, and other files according to their requirement. After adding all the necessary files under a host, user can edit the settings of a particular URL by clicking on the required item as shown below:
button to add html, icon, and other files according to their requirement. After adding all the necessary files under a host, user can edit the settings of a particular URL by clicking on the required item as shown below:
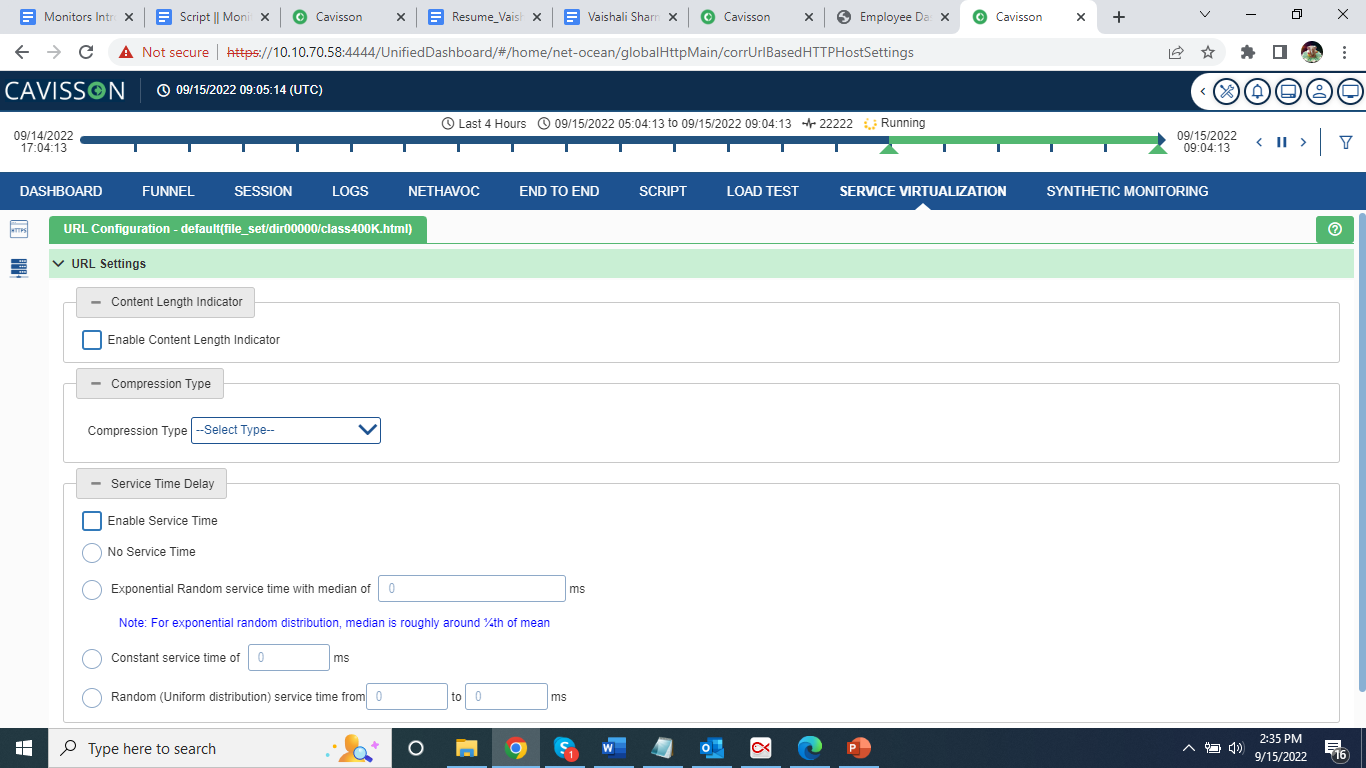
Let us see what all the options/fields signify:
- Compression Type: This keyword is to enable the different types of ‘Content-Encoding’ header in http response like gzip, deflate,br. The response will also be compressed.
- Content Length Indicator: It has the following options:
- Mode: Specifies whether the feature should be Enabled or Disabled.
- Chunk Scheme:
- Size of Chunk: Specifies the size of individual chunk.
- Number of Chunk: It defines the number of chunks in which the response should be served.
- HTTP Service Time: This Keyword is to set Service time delay for static URL.
- No Service Time: No service time is used.
- Exponential Random service time with median: For exponential Random distribution median is roughly around 1/4th of mean.
- Constant service time: Serves a constant delay in the response.
- Random (Uniform distribution) service time: It is used for uniform distributed service time.
Click the ‘server push settings’ and URL configurations window is displayed.
Server Push Settings
Another option available to users is the Server Push Settings ![]() which can be accessed by clicking the icon. Once clicked, the following window is shown:
which can be accessed by clicking the icon. Once clicked, the following window is shown:
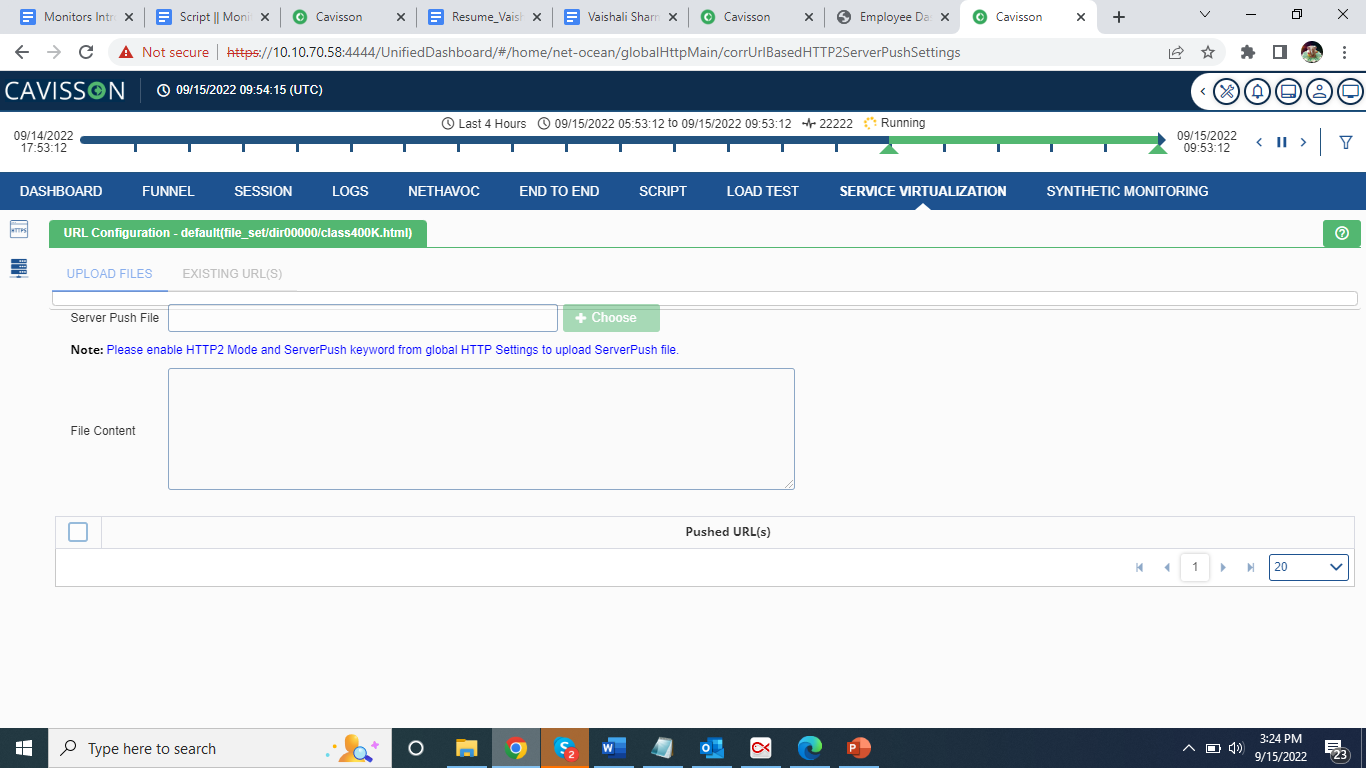
Here, the user should enable the ‘HTTP2 Mode’ and ‘ServerPush’ keyword from the global HTTP Settings to upload the ServerPush File. The fields visible on this page are defined as follows:
Server push: It is a style of Internet-based communication where the request for a given transaction is initiated by the publisher or central server. It allows a server to send resources to a client before the client requests them. After the HTTP2 Mode and ServerPush keywords are enabled, user can add files by clicking on the Choose button and see the file contents in the File Content box below.
Protocol Settings
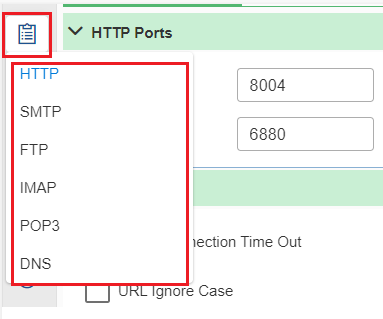
Click the Protocol Settings icon, the following options are displayed – HTTP, SMTP, FTP, IMAP, POP3, DNS.
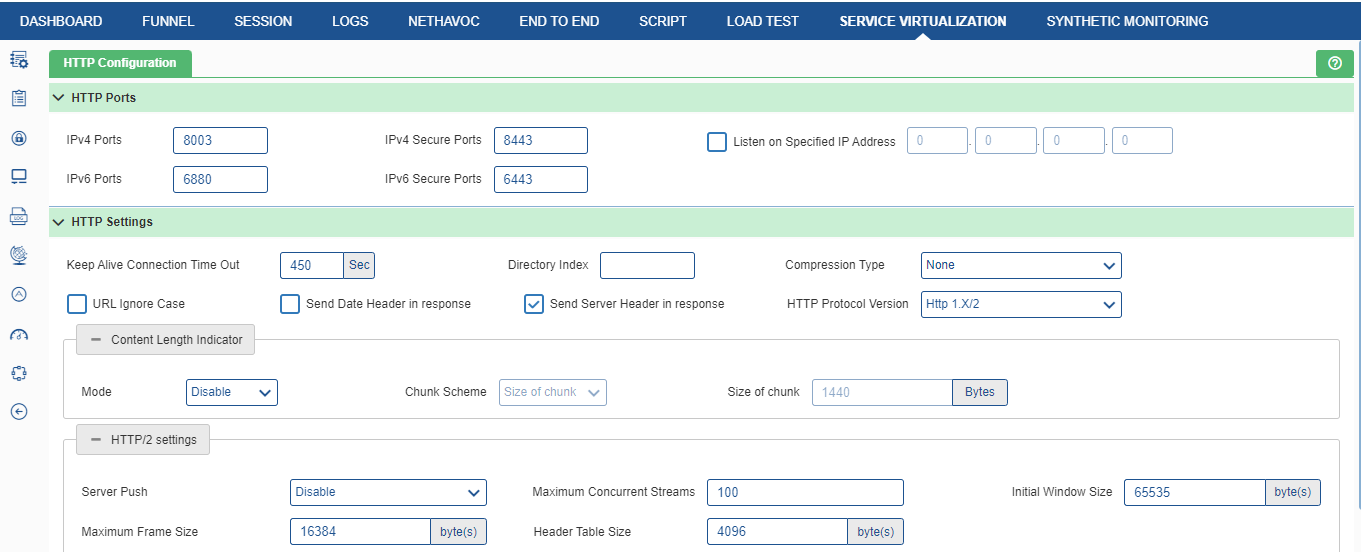
HTTP Ports
It is used to specify the ports for HTTP communication. It has the following options:
- IPv4 ports: HTTP port for IP version 4.
- IPv6 ports: HTTP port for IP version 6.
- IPv4 Secure ports: HTTPS port for IP version 4.
- IPv6 Secure ports: HTTPS port for IP version 6.
- Listen on Specified IP Address: The IP Address where the HPD listens with Normal mode.
HTTP Settings
- Keep Alive Connection Time Out: A browser typically makes multiple requests in order to download an entire Web page. To enhance server performance, most Web browsers request that the server keep the connection open across these multiple requests, which is a feature known as HTTP keep-alive. Without HTTP keep-alive, a browser that makes many requests for a page containing multiple elements, such as graphics, might require a separate connection for each element. These additional requests and connections require extra server activity and resources, decreasing server efficiency. The additional connections also make a browser much slower and less responsive, especially across a slow connection.
- Directory Index: Sets the file that HPD will serve if a directory is requested. If the Directory Index is not configured, then 404 is returned.
- Compression Type: To enable the different types of ‘Content-Encoding’ header in http response like Br, gzip, and deflate. The response will also be compressed.
- None: No Compression
- Gzip or Deflate: Gzip (or Deflate) compresses the web pages and CSS files before sending them to the browser. This operation drastically reduces transfer time since the files are much smaller. In terms of cost versus benefit, gzip compression should be near to the top of page speed optimizations if user don’t have it setup already. Gzip is actually a very simple idea that has extreme power (when put to good use of course). Gzip locates similar strings within a text file (in our case this is commonly CSS and HTML codes) and replaces those strings temporarily with some placeholders to make the overall file size smaller.
- BR: Brotli compression ensures better space utilization and faster page loads with smaller compressed size and it is far better than gzip compression mechanism. While Gzip compression uses a fixed window of 32KB but Brotli uses a sliding window of 1KB to 16MB. In Service Virtualization, Brotli technique is applicable for Correlated Services as well as Static Services.
- URL Ignore Case: If it is enabled, the URL becomes case insensitive.
- Send Date Header in Response: To enable an additional header (i.e Date Header) which contains current date & time in response.
- Send Server Header in Response: To enable Server Header in the response. (Output :- Server: Cavisson Service Virtualization (Linux) (IP: 10.10.30.24:8010)).
- HTTP Protocol Version: There are two modes HTTP 1.X and HTTP 1.X/2. HTTP 1.X is used for HTTP 1.1 protocol. HTTP2 multiplexing is also supported at Service Virtualization side to process multiple HTTP requests of Inline/Embedded URLs concurrently on different streams using a single TCP connection.
- Content Length Indicator: To transfer data into a series of overlapping chunks. Once user select this check box, more options are displayed in the below format.
- Mode: There are further two modes – ‘disable’ and ‘enable’ to specify whether the features should be disabled or enabled.
- Chunk Scheme: Chunk Scheme is based on two options:
- Size of Chunk: The size of the individual chunk.
- Number of Chunk: The number of chunks in which the response should be served.
- HTTP/2 Settings: It has the following options:
- Server Push: User can enable/disable server push globally. To make changes in Server-Push, user need to change the HTTP Mode from 1.X to 1.X/2 and then enable the Server-Push Mode. If server push is enabled, a setting is enabled in static services’ configuration.
- Maximum Concurrent Streams: The number of streams that the server permits to create at a particular time. The range is 100 to 500.
- Initial Window Size: The server’s initial window size (in octets) for stream-level flow control. The range is 65535 (2^16-1) to 2147483647 (2^31-1) bytes.
- Maximum Frame Size: The size of the largest frame payload that the server is willing to receive. The range is 16384 (2^14) to 16777215 (2^24-1) bytes.
- Header Table Size: The maximum size of the header compression table used to decode header blocks in octets. The range is 4096 (2^12) to 65535 (2^16-1) bytes.
Simple Mail Transfer Protocol (SMTP)
SMTP is a communication protocol for electronic mail transmission. To access SMTP, click the SMTP from the protocol settings as shown in Figure 173. Once user click the option, following page appears.
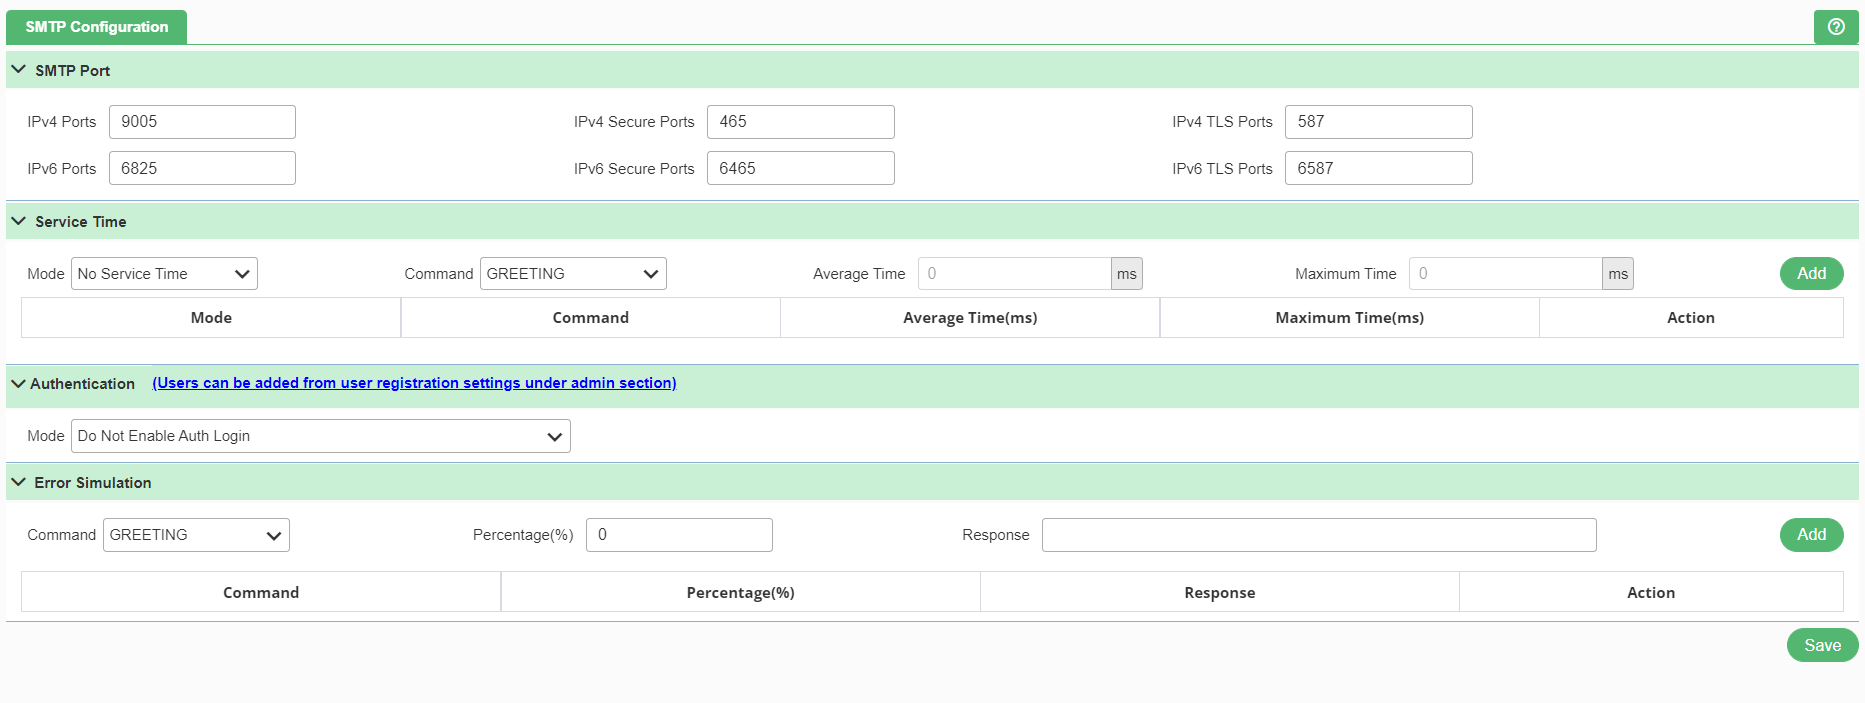
SMTP Port
- IPv4 Ports: SMTP port for IP version 4.
- IPv4 Secure Ports: Implicit SSL SMTP port for IP version 4.
- IPv4 TLS Ports: Explicit SSL SMTP port for IP version 4.
- IPv6 Ports: SMTP port for IP version 6.
- IPv6 Secure Ports: Implicit SSL SMTP port for IP version 6.
- IPv6 TLS Ports: Explicit SSL SMTP port for IP version 6.
Service Time
A service time is the time taken by the system to process a particulate service request. There are following fields which are present in Service Time, which a user needs to fill:
- Mode: To apply service time for SMTP response.
- No Service Time: No service time delay is applied. Helps in doing max load testing.
- Exponential Random: Exponential random service time with median of specified seconds is applied. For exponential random distribution, median is roughly around 1/4th of the mean. This takes a random value equivalent to median time.
- Constant: A constant service time of specified seconds. Helps in doing controlled tests
- Uniform Distribution: It is more Realistic. The value is a random value between the minimum and maximum time defined. Min should be less than or equal to Max.
- Command
- GREETING: Used for session initiation.
- HELO: Starts the conversation identifying the sender server and is generally followed by its domain name.
- EHLO: An alternative command to start the conversation, underlying that the server is using the Extended SMTP protocol.
- AUTH: To authenticate the client to the server.
- USERNAME: Authentication User name
- PASSWORD: Authentication Password
- MAIL: To establish the return address.
- RCPT: To establish a recipient of the message.
- DATA: The email content begins to be transferred; it’s generally followed by a 354 reply code given by the server, giving the permission to start the actual transmission.
- VRFY: The server is asked to verify whether a particular email address or username actually exists.
- EXPN: Asks for a confirmation about the identification of a mailing list.
- RSET: Communicates to the server that the ongoing email transmission is going to be terminated, though the SMTP conversation won’t be closed (like in the case of QUIT).
- NOOP: Used only to check whether the server can respond. “250 OK” reply in response.
- QUIT: Terminates the SMTP conversation.
- HELP: A client’s request for some information that can be useful for a successful transfer of the email.
- DATA_END: It will indicate that data is ended and will not come on this connection
- ALL: To apply service time for all of the commands, choose ALL.
- Average Time: The Time taken in between Min and Max time (Formula: (Min+Max)/2) or (no of transactions * time of each transaction/total no of transactions).
- Maximum Time: Time taken for completing the Service test.
Authentication
- Mode: To support authentication mechanism for SMTP.
- Do Not Enable Auth Login: Do not enable authentication login.
- Enable Auth Login but Do Not Check Validity Of User Name/Password: Enable authentication login but do not check validity of username and password.
- Enable Auth Login and Check Validity Of User Name/Password: Enable authentication login and check the validity of username and password.
Error Simulation
- Command
- GREETING: Used for session initiation.
- HELO: Starts the conversation identifying the sender server and is generally followed by its domain name.
- EHLO: An alternative command to start the conversation, underlying that the server is using the Extended SMTP protocol.
- AUTH: To authenticate the client to the server.
- USERNAME: Authentication User name
- PASSWORD: Authentication Password
- MAIL: To establish the return address.
- RCPT: To establish a recipient of the message.
- DATA: The email content begins to be transferred; it’s generally followed by a 354 reply code given by the server, giving the permission to start the actual transmission.
- VRFY: The server is asked to verify whether a particular email address or username actually exists.
- EXPN: Asks for a confirmation about the identification of a mailing list.
- RSET: Communicates to the server that the ongoing email transmission is going to be terminated, though the SMTP conversation won’t be closed (like in the case of QUIT).
- NOOP: Used only to check whether the server can respond. “250 OK” reply in response.
- QUIT: Terminates the SMTP conversation.
- HELP: A client’s request for some information that can be useful for a successful transfer of the email.
- DATA_END: It will indicate that data is ended and will not come on this connection
- ALL: To apply service time for all of the commands, choose ALL.
- Percentage: Value in percent for which user wants the user defined response in case of error simulation.
- Response:User defined response in case of Error simulation.
File Transfer Protocol (FTP)
FTP is a standard network protocol used for the transfer of computer files between a client and server on a computer network. To access FTP, click the FTP from the protocol settings as shown in Figure 169. Once user click the option, following page appears.

FTP Port
- IPv4 Ports: FTP port for IP version 4.
- IPv6 Ports: FTP port for IP version 6.
- FTP Data Connection Time
Service Time
- Mode: To apply service time for FTP response.
- No Service Time: No service time delay is applied. Helps in doing max load testing.
- Exponential Random: Exponential random service time with median of specified seconds is applied. For exponential random distribution, median is roughly around 1/4th of the mean. This takes a random value equivalent to median time.
- Constant: A constant service time of specified seconds. Helps in doing controlled tests
- Uniform Distribution: It is more Realistic. The value is a random value between the minimum and maximum time defined. Min should be less than or equal to
- Command
- USER: Authentication username.
- PASS: Authentication password.
- PASV: Passive mode.
- PORT: An address and port to which the server should connect.
- RETR: Retrieve a copy of the file.
- QUIT: Disconnect.
- TYPE: Sets the transfer mode.
- STOR: Accept the data and to store the data as a file at the server site.
- ALL: To apply service time for all of the commands, choose ALL.
- Average Time: The Time taken in between Min and Max time (Formula: (Min+Max)/2) or (no of transactions * time of each transaction / total no of transactions).
- Maximum Time: Time taken for completing the Service test.
Error Simulation
- Command
- USER: Authentication username.
- PASS: Authentication password.
- PASV: Passive mode.
- PORT: An address and port to which the server should connect.
- RETR: Retrieve a copy of the file.
- QUIT: Disconnect.
- TYPE: Sets the transfer mode.
- STOR: Accept the data and to store the data as a file at the server site.
- ALL: To apply service time for all of the commands, choose ALL.
- Percentage: Value in percent for which user wants the user defined response in case of error simulation.
- Response: User defined response in case of Error simulation.
Internet Message Access Protocol (IMAP)
IMAP is an Internet standard protocol used by email clients to retrieve email messages from a mail server over a TCP/IP connection. To access IMAP, click the IMAP from the protocol settings as shown in Figure 173. Once user click the option, following page appears.
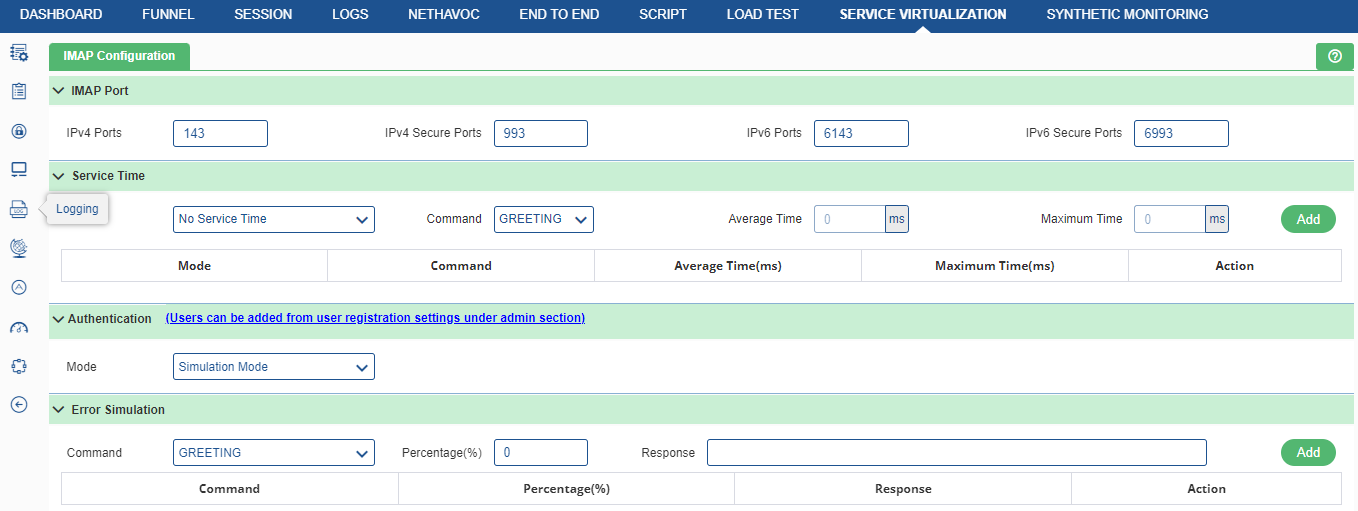
IMAP Port
- IPv4 Ports: IMAP port for IP version 4.
- IPv4 Secure Ports: Implicit port for IP version 4.
- IPv6 Ports: IMAP port for IP version 6.
- IPv6 Secure Ports: Implicit port for IP version 6.
Service Time
- Mode: To apply service time for IMAP response.
- No Service Time: No service time delay is applied. Helps in doing max load testing.
- Exponential Random: Exponential random service time with median of specified seconds is applied. For exponential random distribution, median is roughly around 1/4th of the mean. This takes a random value equivalent to median time.
- Constant: A constant service time of specified seconds. Helps in doing controlled tests.
- Uniform Distribution: It is more Realistic. The value is a random value between the minimum and maximum time defined. Min should be less than or equal to Max.
- Command
- GREETING: Used for session initiation.
- LOGIN: Establishes authentication and enters the authenticated state.
- SELECT: Select a mailbox for access and enter the selected state.
- LIST: Returns a subset of names from the complete set of all names available to the client.
- FETCH: Retrieves data associated with a message in the mailbox.
- DELE: Permanently removes the mailbox with the given name.
- LOGOUT: Informs the server that the client is done with the connection.
- NOOP: Used as a periodic poll for new messages or message status updates during a period of inactivity
- CAPABILITY: Requests a listing of capabilities that the server supports.
- ALL: To apply service time for all of the commands, choose ALL.
- Average Time: The Time taken in between Min and Max time (Formula: (Min+Max)/2) or (no of transactions * time of each transaction/total no of transactions).
- Maximum Time: Time taken for completing the Service test.
Authentication
- Mode
- Simulation Mode
- Live Mode
Error Simulation
- Command
- GREETING: Used for session initiation.
- LOGIN: Establishes authentication and enters the authenticated state.
- SELECT: Select a mailbox for access and enter the selected state.
- LIST: Returns a subset of names from the complete set of all names available to the client.
- FETCH: Retrieves data associated with a message in the mailbox.
- DELE: Permanently removes the mailbox with the given name.
- LOGOUT: Informs the server that the client is done with the connection.
- NOOP: Used as a periodic poll for new messages or message status updates during a period of inactivity.
- CAPABILITY: Requests a listing of capabilities that the server supports.
- ALL: To apply service time for all of the commands, choose ALL.
- Percentage: Value in percent for which user wants the user defined response in case of error simulation.
- Response: User defined response in case of Error simulation.
Post Office Protocol Ver3 (POP3)
POP3 is an application-layer Internet standard protocol used by email clients to retrieve email from a mail server. To access POP3, click the POP3 from the protocol settings as shown in Figure 169. Once user click the option, following page appears.
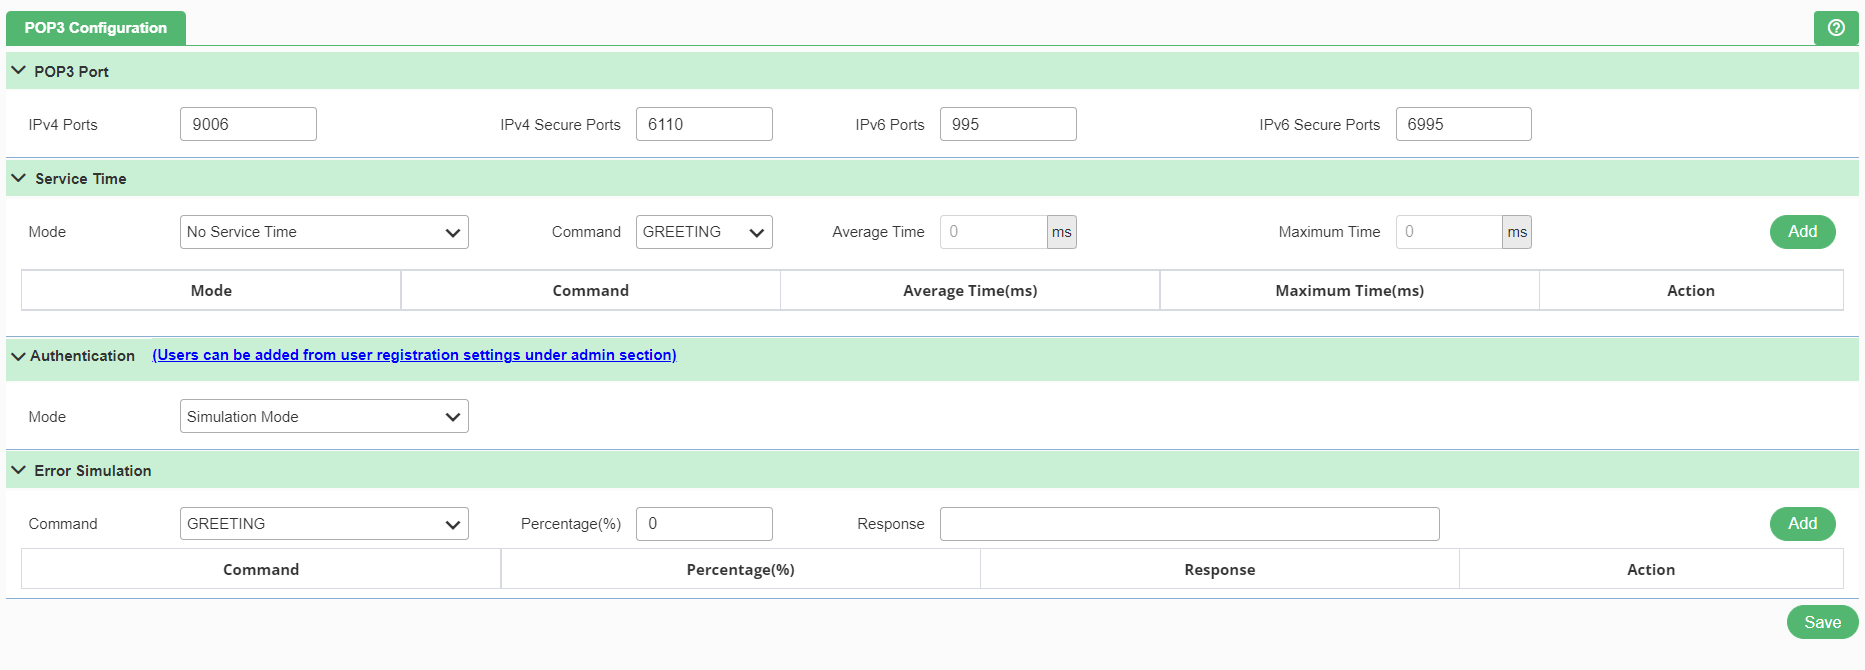
POP3 Port
- IPv4 Ports: POP3 port for IP version 4.
- IPv4 Secure Ports: Implicit port for IP version 4.
- IPv6 Ports: POP3 port for IP version 6.
- IPv6 Secure Ports: Implicit port for IP version 6.
Service Time
- Mode: To apply service time for POP3 response.
- No Service Time: No service time delay is applied. Helps in doing max load testing.
- Exponential Random: Exponential random service time with median of specified seconds is applied. For exponential random distribution, median is roughly around 1/4th of the mean. This takes a random value equivalent to median time.
- Constant: A constant service time of specified seconds. Helps in doing controlled tests
- Uniform Distribution: It is more Realistic. The value is a random value between the minimum and maximum time defined. Min should be less than or equal to Max.
- Command
- GREETING: Used for session initiation.
- USER:
- PASS:
- STAT: Displays the number of messages currently in the mailbox and the size in bytes.
- LIST: To get a summary of messages.
- RETR: To retrieve a particular message.
- DELE: To delete a message.
- NOOP: Used as a periodic poll for new messages or message status updates during a period of inactivity.
- RSET: To reset the session to its initial state.
- QUIT: To end the POP3 conversation.
- ALL: To apply service time for all of the commands, choose ALL.
- Average Time: The Time taken in between Min and Max time (Formula: (Min+Max)/2) or (no of transactions * time of each transaction / total no of transactions).
- Maximum Time: Time taken for completing the Service test.
Authentication
- Mode
- Simulation Mode
- Live Mode
Error Simulation
- Command
- GREETING: Used for session initiation.
- USER:
- PASS:
- STAT: Displays the number of messages currently in the mailbox and the size in bytes.
- LIST: To get a summary of messages.
- RETR: To retrieve a particular message.
- DELE: To delete a message
- NOOP: Used as a periodic poll for new messages or message status updates during a period of inactivity.
- RSET: To reset the session to its initial state.
- QUIT: To end the POP3 conversation.
- ALL: To apply service time for all of the commands, choose ALL.
- Percentage: Value in percent for which user wants the user defined response in case of error simulation.
- Response: User defined response in case of Error simulation.
Domain Name System Protocol (DNS)
DNS uses both User Datagram Protocol (UDP) and Transmission Control Protocol (TCP) on all specified ports to serve the DNS queries. UDP is preferred because it is fast and has low overhead. A DNS query is a single request from the DNS client followed by a single reply from the server. To access DNS, click the DNS from the protocol settings as shown in Figure 169. Once user click the option, following page appears.
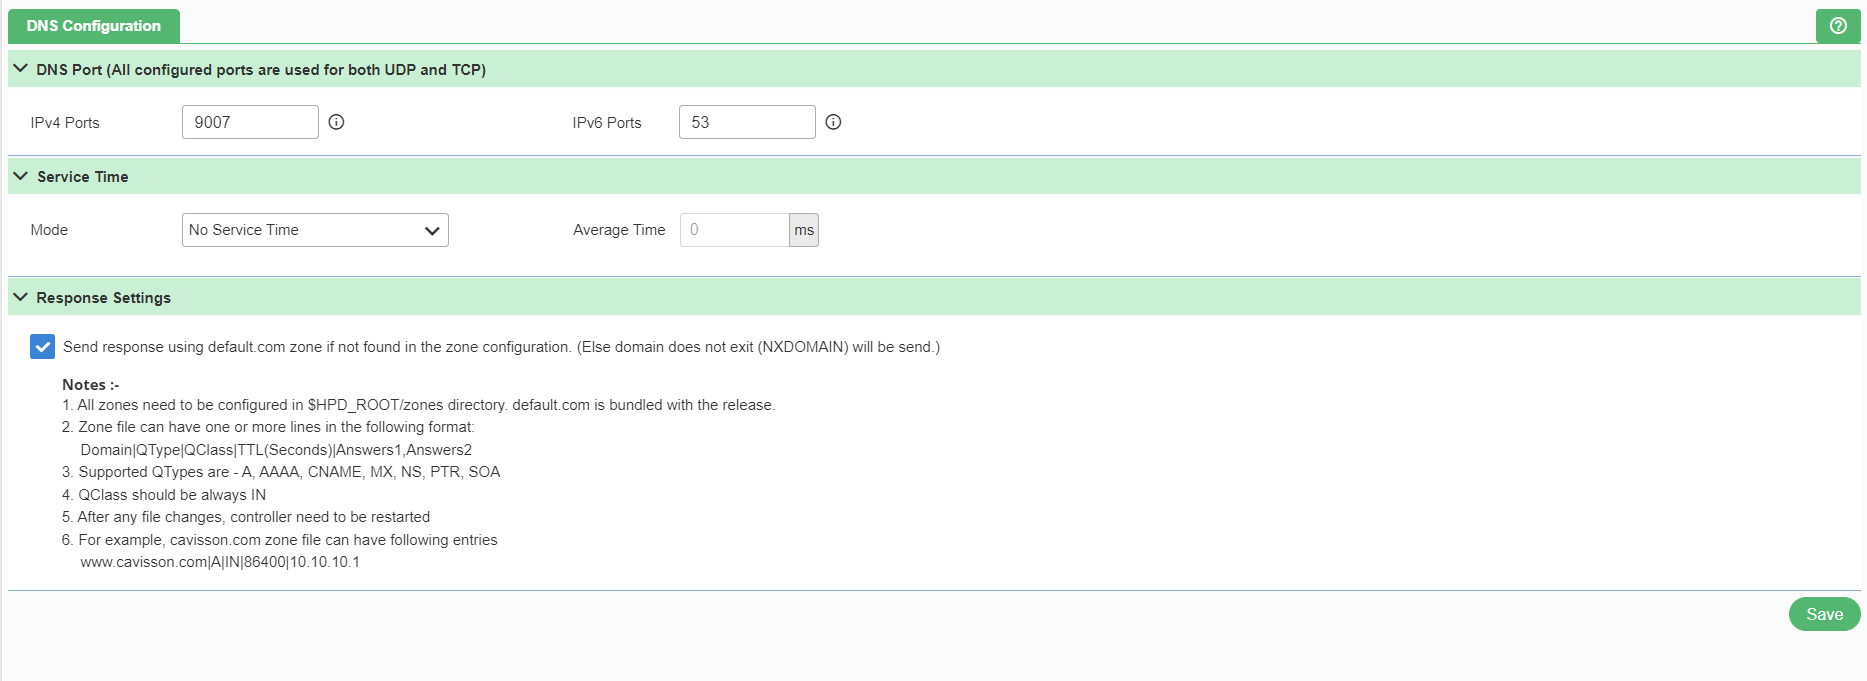
DNS Port
- IPv4 Ports:DNS port for IP version 4.
- IPv6 Ports:DNS port for IP version 6.
Service Time
- Mode
- No Service Time: No service time delay is applied. Helps in doing max load testing.
- Exponential Random:Exponential random service time with median of specified milliseconds is applied. For exponential random distribution, median is roughly around 1/4th of the mean. This takes a random value equivalent to median time.
- Constant:A constant service time of specified milliseconds. Helps in doing controlled tests.
- Uniform Distribution:It is more Realistic. The value is a random value between the minimum and maximum time defined. Min should be less than or equal to Max.
Response Settings
Send response using default.com zone if not found in the zone configuration. (Else domain does not exit (NXDOMAIN) will be sent.
Notes:
- All zones need to be configured in $HPD_ROOT/zones directory. default.com is bundled with the release.
- Zone file can have one or more lines in the following format:
Domain|QType|QClass|TTL(Seconds)|Answers1, Answers2
- Supported QTypes are – A, AAAA, CNAME, MX, NS, PTR, SOA
- QClass should be always IN
- After any file changes, controller need to be restarted
- For example, cavisson.com zone file can have following entries
www.cavisson.com|A|IN|86400|10.10.10.1
SSL Configuration
The Secure Socket Layer (SSL) configuration contains the attributes that user need to control the behavior of client and server SSL endpoints. There are two options within this menu – SSL Configuration and SSL Management. To access SSL configuration click the SSL Configuration menu item![]() and select SSL Configuration in the drop down to access the module as shown in figure below.
and select SSL Configuration in the drop down to access the module as shown in figure below.

The following screen is displayed on clicking this option.

Specify the following fields:
- Client Authentication during handshake: This enables the client authentication during the handshake process between the client and the server.
- TLS Version: It provides communication security over a computer network to have privacy and data integrity between two or more communicating computer applications. The available options are – SSL V3, TLS 1.0, TLS 1.1, TLS 1.2, TLS 1.3, and all versions.
- Cipher Suite: It contains a set of algorithms that help to secure a network connection. It typically uses Transport Layer Security (TLS). If the cipher suite is not selected, the default cipher suite will be considered according to the selected TLS version.
- Server Certificate Chain: User need to provide the server certificate path. The path where the server certificate is installed.
- Certificate Authority (CA): A CA issues digital certificatesthat contain a public key and the identity of the owner. Here, user need to provide the CA path.
- Certificate Revocation Lists (CRL): A certificate revocation list (CRL) is a list of certificates (or more specifically, a list of serial numbers for certificates) that have been revoked or are no longer valid, and therefore should not be relied upon.
- Client Authentication Depth: Depth value is a number which specifies how deeply to verify the certificate issuer chain before deciding the certificate is not valid.
- SSL Extra Certificate Chain Files This option is used to add an extra SSL Chain file certificate. The user has to enter the file name in .der This saves the certificates with specified settings.
SSL Management
SSL Management is the process of monitoring and managing the lifecycles from acquisition and deployment to tracking renewal, usage and expiration of all the SSL certificate which are deployed within the network. This section is used to view the Service Virtualization SSL management that contains details of SSL certificates and certificate revocation list. To access SSL configuration, click the SSL Management menu item![]() and select SSL Management in the drop down to access the module as shown in figure below.
and select SSL Management in the drop down to access the module as shown in figure below.

Let us discuss both of these in detail:
Certificates
This section lists out all the added certificates along with their details such as
- File name: It defines the name of the file.
- File type: It is the certificate format.
- Common name: It defines the common name used for certificate.
- Organization: It defines the name of the organization for which the certificate is being issued.
- Expiration: It defines the validity of the certificate
- Issuer: It defines the name of the authorized personal who has issued the certificate. It can be either: Self or Certificate Authority.

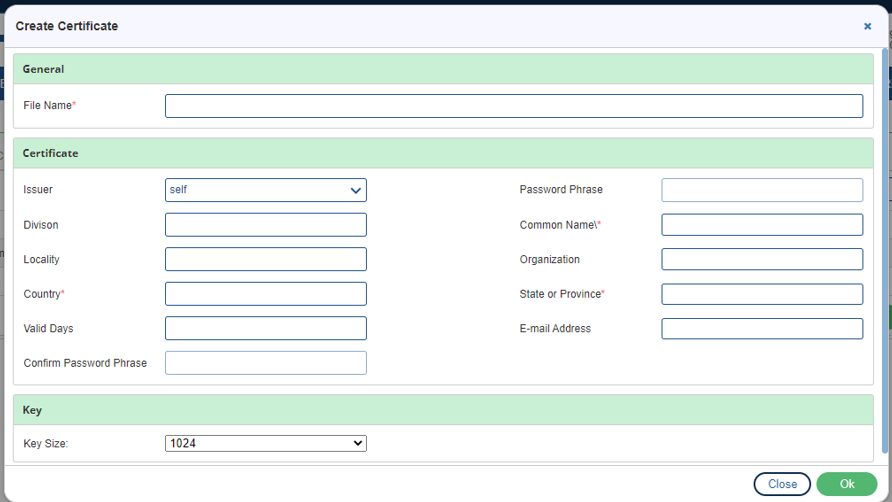
User can create a certificate using the Create button. A window is displayed where user need to provide certain details, such as general details, certificate details, and key details to create a certificate.
Click on the Create button. The Create Certificate window is displayed where user needs to provide following details:
- General: In this field, the user has to provide the File Name.
- Certificate: In this field, the user has to provide the following details:
- Issuer: The name of the authorized personal who has issued the certificate. It can be either: Self or Certificate Authority.
- Password Phrase: It defines the phrase for the password.
- Division: It defines the division of the certification.
- Common Name: The common name used for certificate. It is a mandatory field.
- Locality: The locality from where the certificate is being issued.
- Organization: The name of the organization for which the certificate is being issued.
- Country: The name of the country from where the certificate is being issued. It is a mandatory field.
- State or Province: The name of the State or Province from where the certificate is being issued. It is a mandatory field.
- Valid Days: It defines the validity of the certificate in days.
- E-mail Address: The E-mail address of the issuer.
- Confirm Password Phrase: In this field, the user has to re-enter the password phrase for confirmation.
- Key: This field allows the user to select the key size for a key. There are two predefined key size – 1024 and 2048.
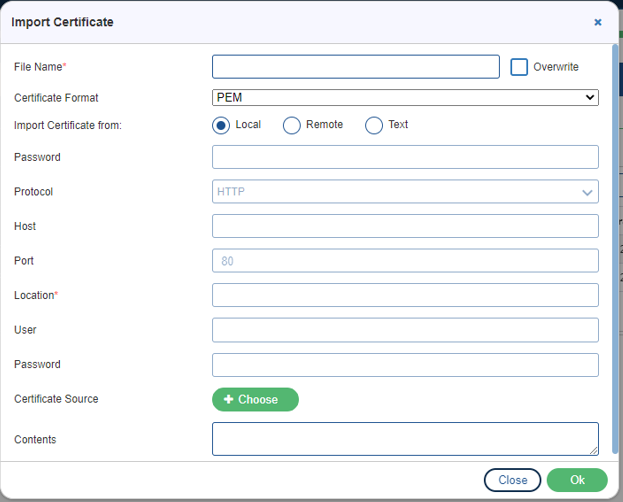
User can also import a certificate by clicking the Import button on the Certificate window. A window is displayed where they need to provide details on the file to import.
Click on the Import ![]() button. The Import Certificate window is displayed where the user needs to provide the following details:
button. The Import Certificate window is displayed where the user needs to provide the following details:
- File Name: The name of the file which is being imported.
- Certificate Format: The type of certificate format to be imported. There are three format – PEM, DER, PFX.
- Import Certificate from: The location from where the file is to be imported. There are three ways – Local, Remote, Text.
Note: If a user selects Remote, then they have to select the protocol type in which they want to import the certificate.
- Password: The password which is to be given by the user.
- Protocol: The type of protocol to be used i.e. HTTP, HTTPS, FTP, TFTP, SCP.
- Host: It defines the hostname.
- Port: It defines the port. By default, the port is 80.
- Location: The location from where the certificate is to be imported. It is a mandatory field.
- User: It defines the user name to be used.
- Password: It defines the password against the user name to be used.
- Certificate Source: The source for the certificate. User can click on the Choose
 button if they want to add the source from their local.
 - Contents: It defines the content of the file which is to be sent.
The delete and export options either delete or export the selected certificate from the list.
Certificate Revocation List
A Certificate Revocation List (CRL) is a list of digital certificates that have been revoked by the issuing Certificate Authority (CA) before their scheduled expiration date and should no longer be trusted. User can view the list, import it, or can export it.

Import Button

Click ![]() button to select the path and select that file wanted to import.
button to select the path and select that file wanted to import.

Now enter the File Name then click on import icon ![]() .
.
If user want to export the file, first select from the check box then click on Export.
By clicking Delete button, user can simply delete the selected certificate file.
Service Time Settings
Service Virtualization sends response of the service as soon as the request is received. So, there is no delay in the response. Users can add service time delay by using Service Time Delay settings which can be accessed within the configurations menu by clicking on the following icon: ![]() as shown in the figure below.
as shown in the figure below.
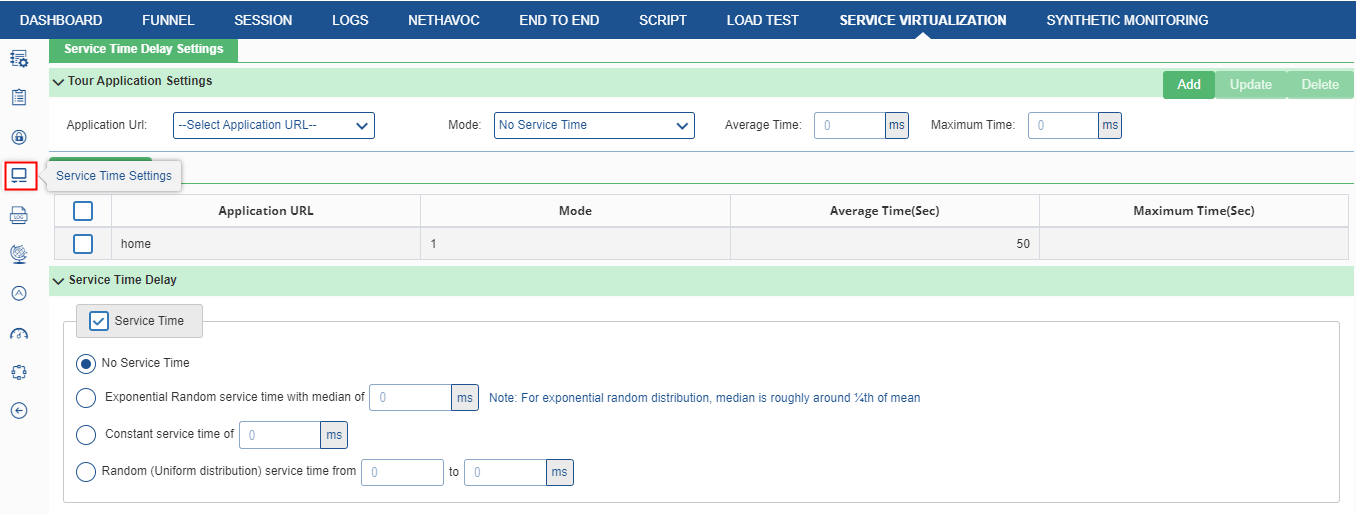
Once clicked, the following screen can be seen:
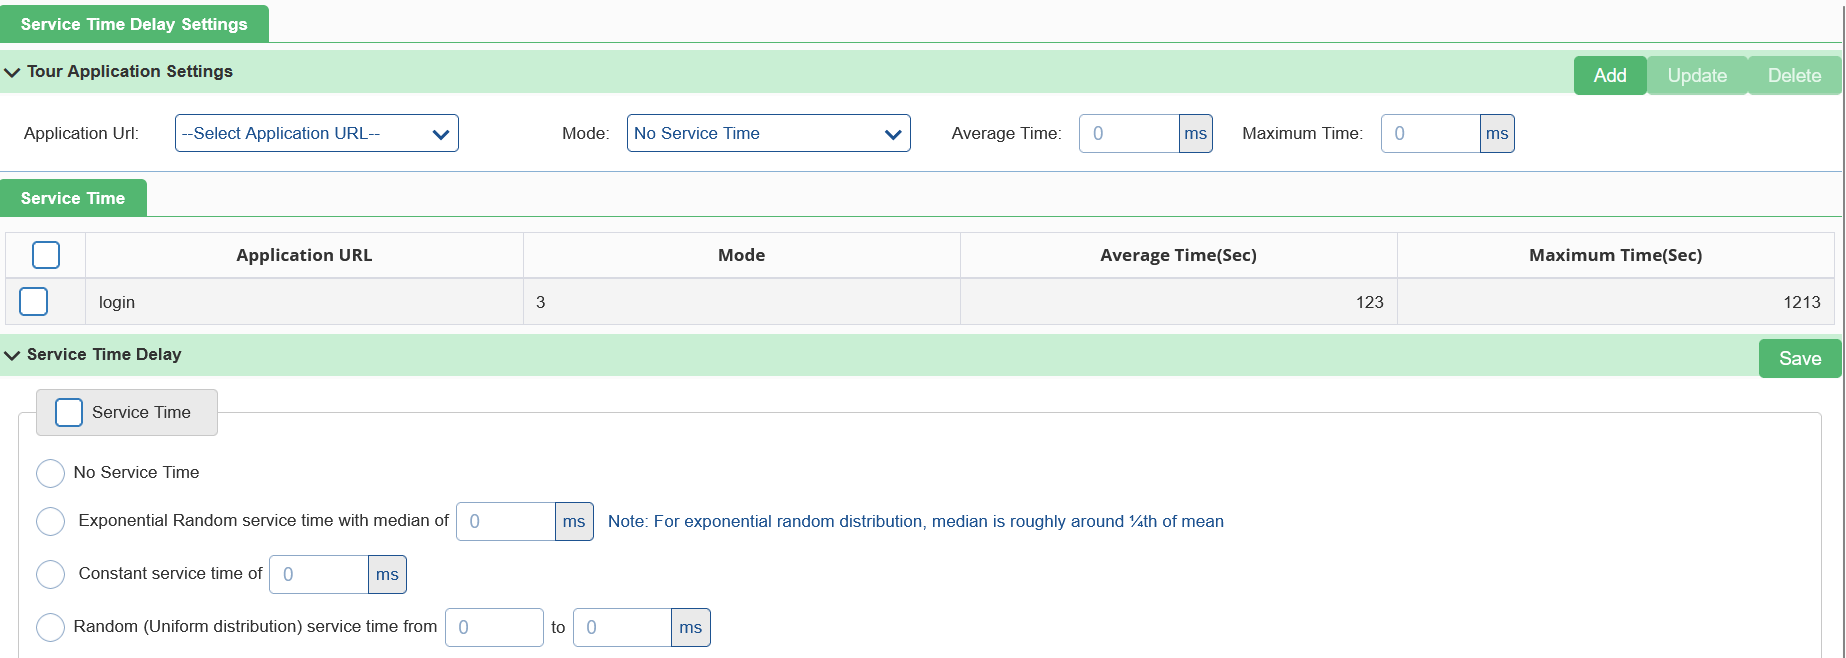
Specify the following fields:
Tour Application Settings
- Application URL: Select the application URL from the drop-down list.
- Mode: To apply service time for Static URLs.
- No Service Time: No service time delay is applied. Helps in doing max load testing.
- Exponential Random: Exponential random service time with median of specified seconds is applied.
- Constant: A constant service time of specified seconds. Helps in doing controlled tests.
- Uniform Distribution: It is more Realistic. The value is a random value between the minimum and maximum time defined. Min should be less than or equal to Max.
- Average Time: The Time taken in between Min and Max time (Formula: (Min+Max)/2) or (no of transactions * time of each transaction/total no of transactions).
- Maximum Time: Time taken for completing the Service test.
Click on Add to see the applied settings in the Service Time table below the configuration option.
Service Time Delay
There are following fields in Service Time delay.
- Enable Service Time: Select this check box to enable service time and proceed further.
- No service time: No service time used.
- Exponential Random service time: For exponential random distribution, median is roughly around ¼th of mean.
- Constant service time: This property is used to provide constant service time.
- Random (Uniform distribution) service time: This property is used for uniform distributions service time.
Logging
To access Logging click the Logging ![]() menu item as shown in figure below.
menu item as shown in figure below.

Once user click the icon, following page apppears.
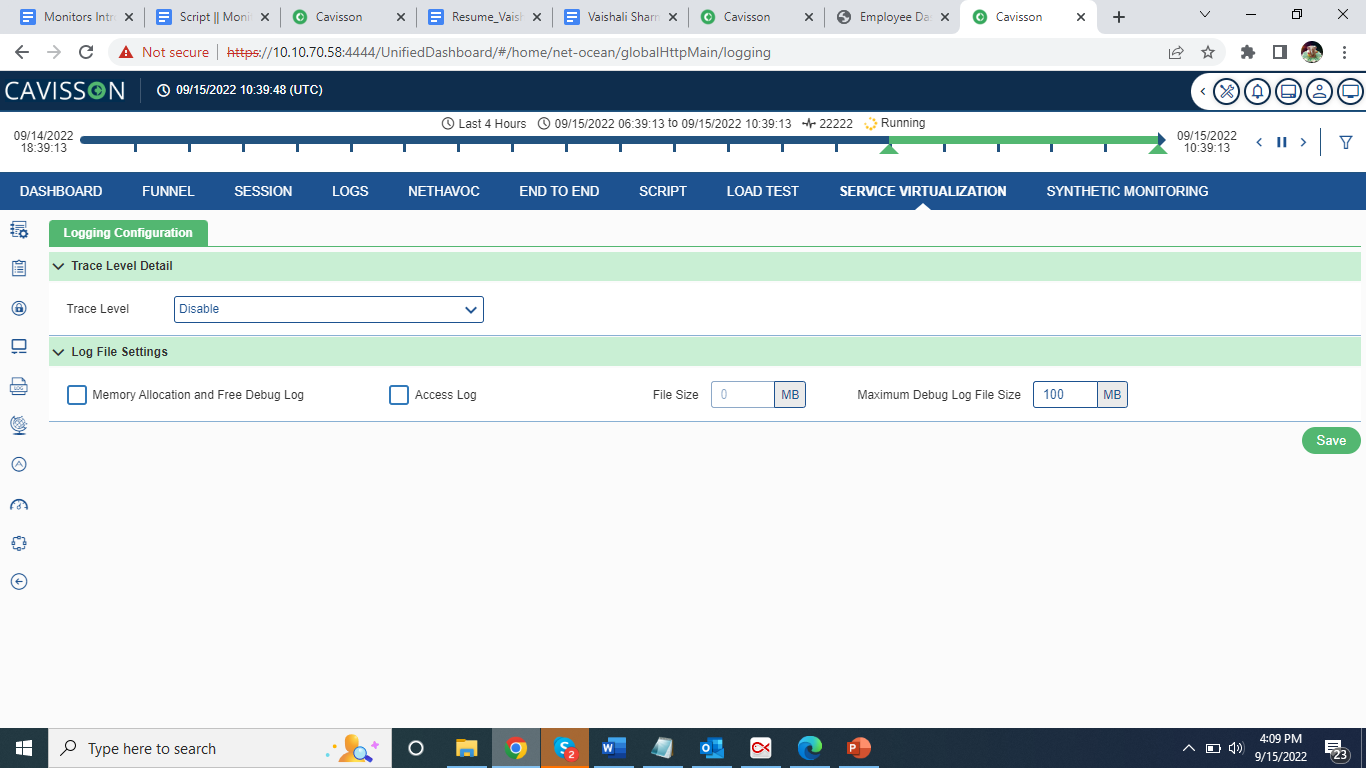
Specify the following fields:
- Trace Level:
- Disabled: No logs.
- Level 1: Request arrival time, URL, client IP, port, request file, service time, template name, response file, response time.
- Level 2: Level 1 + parameters names and their values applied to that service.
- Memory allocation and free debug log: To enable the memory Allocation and debug logs.
- Maximum Debug Log File Size: User can provide the maximum size of Service Virtualization Server_debug.log file. Debug Log File size is in MB.
- Access log: Request stats using access Log such as Requests/Sec, Service Time, Receive Throughtput.
Internet Simulation
To access Internet Simulation ![]() click the icon as shown in figure below.
click the icon as shown in figure below.
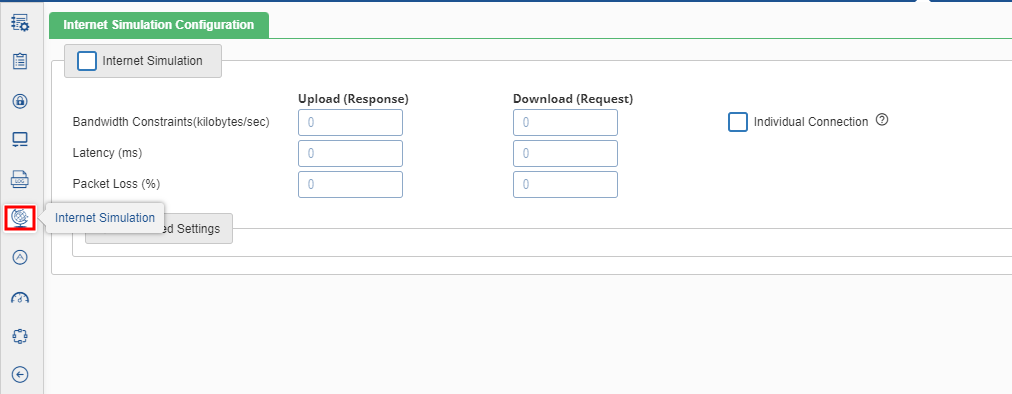
Once user click the icon, the following page opens.
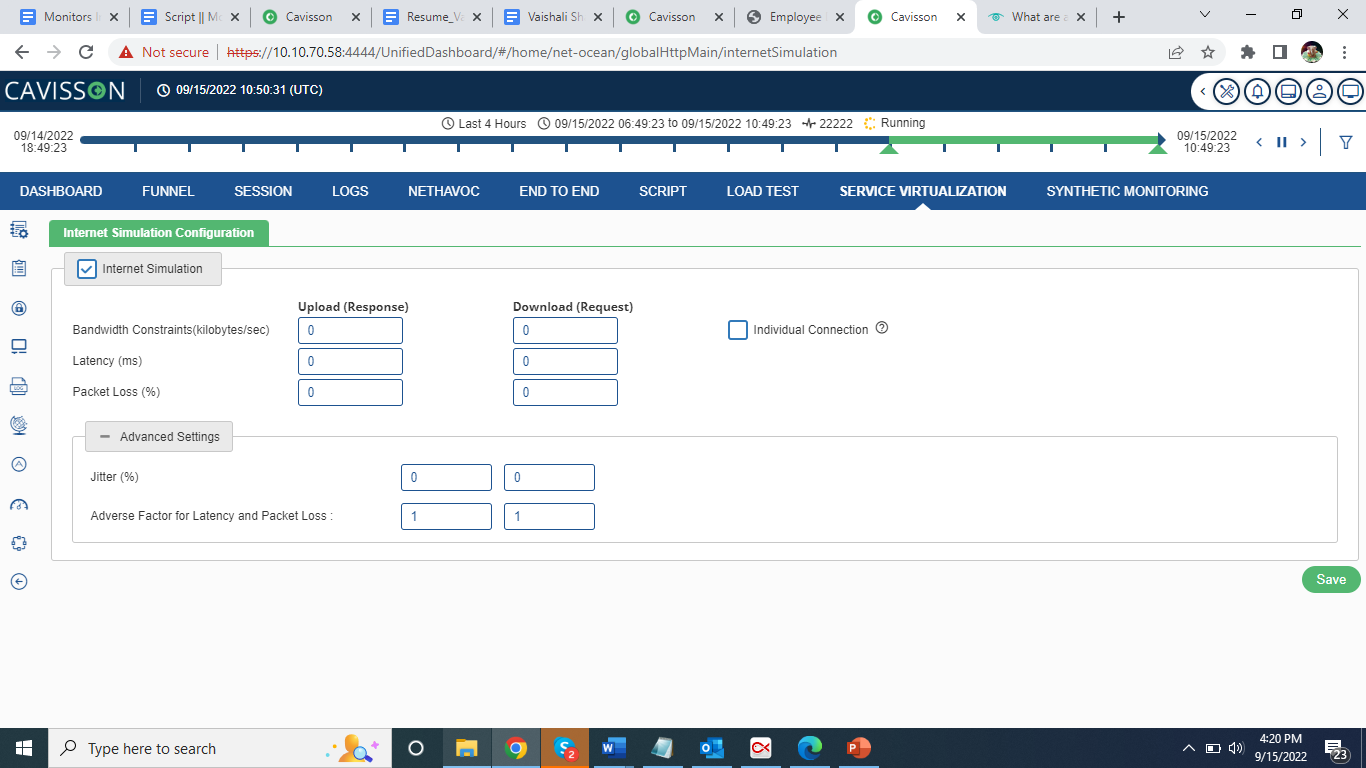
Specify the following fields:
- Enable Internet Simulation: This is used to activate the WAN simulation. To enable internet simulation, select the Internet Simulation check box.
- Individual Connection
- User checked the individual connection then bandwidth constraints for individual connection.
- User unchecked the individual connection then bandwidth constraints for overall connection.
- Bandwidth Constraints(kilobits/sec)
- Upload: It is the bandwidth limitation from NO to NS (server to client).
- Download: It is the bandwidth limitation from NS to NO (client to server).
- Latency (mili-secs)
- Upload: It is the time interval between the stimulation and response from NO to NS.
- Download: It is the time interval between the stimulation and response from NS to NO.
- Packet Loss (%)
- Upload: It is the percentage of packets lost while data travelling from NO to NS.
- Download: It is the percentage of packets lost while data travelling from NS to NO.
Advanced Settings
- Adverse factor for latency and packet loss: It is the variable percentage for latency and packet loss from NO to NS and vice versa.
- Jitter (%)
- Forward: It is any deviation in, or displacement of, the signal pulses in a high-frequency digital signal from NO to NS (server to client).
- Backward: It is any deviation in, or displacement of, the signal pulses in a high-frequency digital signal from NS to NO (client to server).
Advance Settings
Click the Advance Settings![]() icon under the Configuration section as shown in below figure.
icon under the Configuration section as shown in below figure.

Once user click this icon, they will be directed to the following screen:

The definition of the fields is as follows:
- Reverse Proxy Mode: To use Service Virtualization as a proxy server. Reverse Proxy Server is a type of proxy server that typically sits behind the firewall in a private network and directs client requests to the appropriate backend server.
- IPv6: To enable IPV6 support in Service Virtualization
- Maximum Number of IO Vectors: Maximum number of segments to be made for response. Rest response data is truncated.
- Maximum Request Size: Maximum size of the request. Provide the value in ‘bytes’ with a range from 0 to 10GB.
- Other Protocols: To enable other protocols in Service Virtualization. By default, only HTTP protocol is enabled.
Forward Setting
To enable/disable the forward requests. Requests are forwarded to the next server (whose server details has to be provided in the forward text field) to serve the response.
- Connection Timeout: Provide the connection timeout value, if forward setting enabled. Its unit is in seconds and default value is 45 sec.
- Response Timeout: Provide the response timeout value, if forward setting enabled. Its unit is in seconds and default value is 60 sec.
Service Virtualization Server Performance Settings:
- Start Up Mode: To start the HPD in startup mode. Multiple HPD processes are started to handle the load.
- Normal Mode
- Server IP Based Mode
- Auto Mode
- Optimize Ethernet Packet Flow: Select any one of the following from the drop down.
- 0
- 1
- 2
- Time Stamp: Timeout in milliseconds (for connections) for the first request.
- Use Kernel Jiffy
- Use CPU frequency
- Use Unix System Call (get time of day)
- Maximum Connections Per Child: Number of connections established per child. Maximum number of concurrent connections to be handled by one HPD process. Default value is 32768 connections.
- Number of Service Virtualization Virtual Machine: The number of processes that HPD runs. Number of processes is 2 per CPU. For example: if the machine is dual core CPUs, then total 8 (2*4). processes run. There are the following options.
- Auto (2 per core)
- Specified

PINPAD Settings
PinPad services are used to serve the requests of PinPad devices. A PIN pad or PIN entry device is an electronic device used in a debit, credit, or smart card-based transaction to accept and encrypt the cardholder’s personal identification number (PIN), for example – an ATM machine.
- Pinpad Trace: To apply the pinpad settings, user first needs to enable this keyword.
- Pinpad Ports: Specify the port of the pinpad services.
- Keys: Specify the value of the key here.
Project Settings
- Project Directory: Used to create/choose different correlation directory. It helps in segregation of services.
JMS Settings
Java Message Service (JMS) is an application program interface (API) that supports the formal communication known as messaging between computers in a network. Here the Service Virtualization act as consumer and consume the information from JMS server and forward it to other server if needed.
This section is used to add JMS configuration and manage JMS configuration. The description is provided in the subsequent sections. Click the JMS icon ![]() under the Configuration section as shown in below figure.
under the Configuration section as shown in below figure.

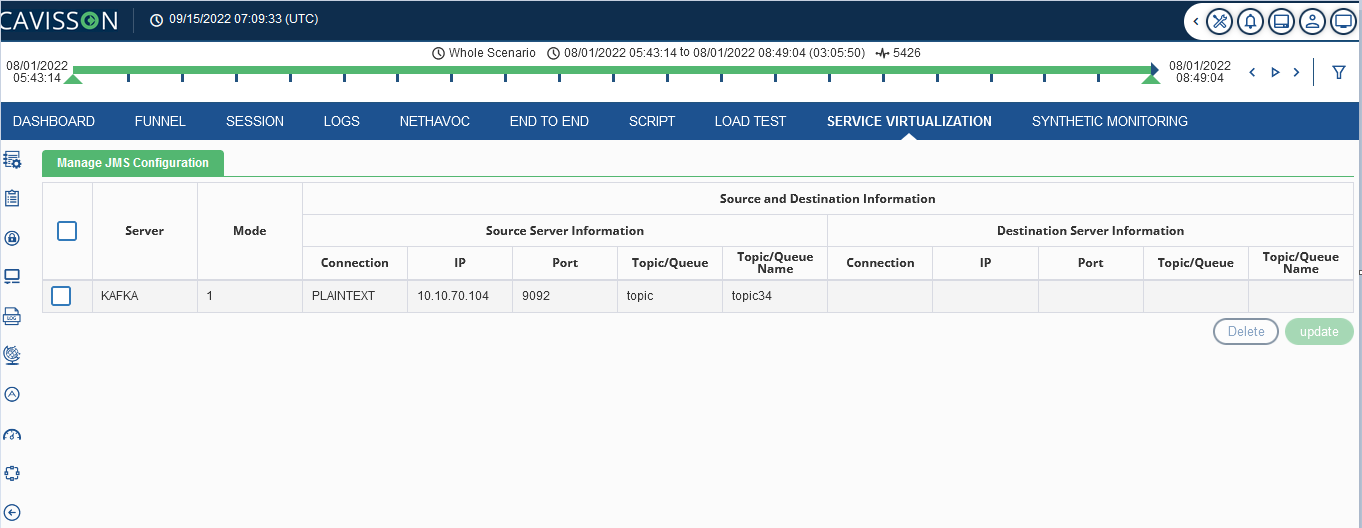
This window displays following information,
- Server: Shows the server Type-Kafka, TIBCO or IBMMQ.
- Mode: Enter the mode number.
- Source and destination information
- IP: IP address where JMS is to be configured.
- Port: A port is a number assigned to uniquely identify a connection endpoint
- Topic/queue: It is used as a message oriented middleware that is responsible to hold and deliver messages
- Topic/queue name: Name of the topic/queue.
User can select any check box corresponding to the configuration, and choose to update or delete the configuration. While deleting any configuration, a confirmation popup message is displayed.
Add JMS Configuration
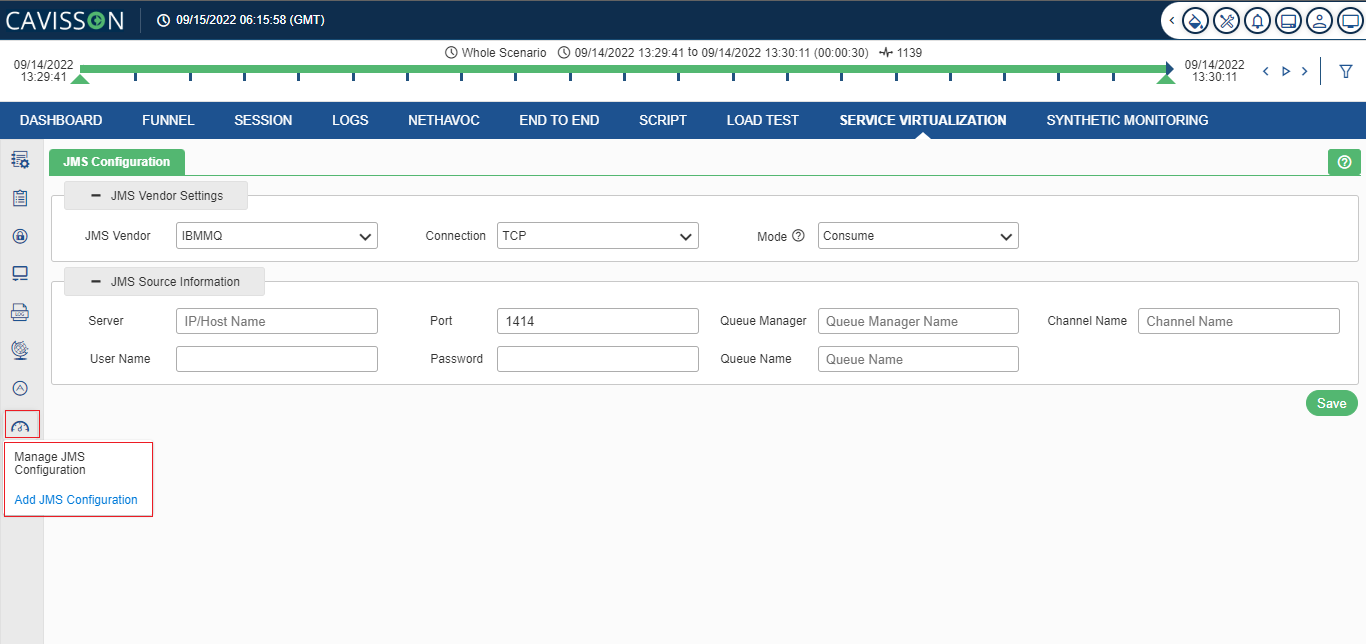
To add JMS settings, go to JMS Settings > Add JMS Configuration. The JMS Settings window is displayed where user can configure the JMS settings based on the provided details:

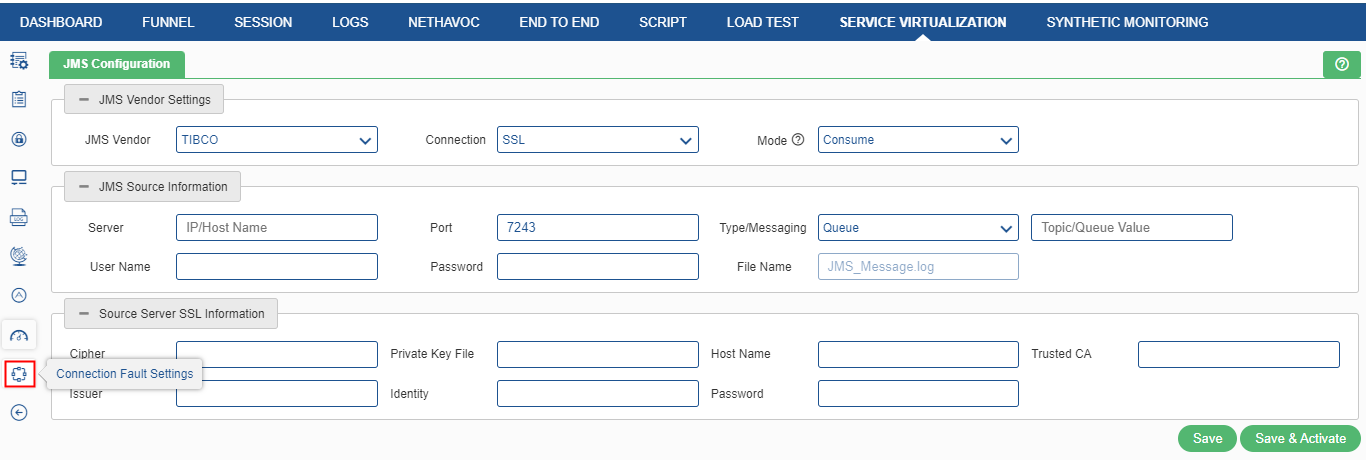
JMS Vendor Settings
- JMS Vendor: Select the JMS Vendor ‘TIBCO’ or ‘IBMMQ’ or ‘KAFKA’ from the drop-down list.
- Connection: Select the connection either TCP or SSL. In case SSL is selected, user need to provide the source SSL server information too. It is only for TIBCO and IBMMQ.
- Mode: There are two modes – ‘Consume’ and ‘Forward’. In case of ‘Consume’, Service Virtualization first consumes the message and then discard it and user need to provide the JMS Source information only. In case of mode ‘Forward’, Service Virtualization first consumes the message and send it to the destination. User need to provide both JMS Source and Destination information.
TIBCO

JMS Source/Destination Information
- Server IP / Host Name: It is the Tibco Server IP / Host name. It is a mandatory field.
- Port: It is the port where Tibco is listening. It is a mandatory field.
- Type/Messaging: (Topic/Queue) Queue is responsible for holding the message until the receiver is ready. Topic is used as a message-oriented middleware that is responsible for holding and delivering messages. The user can either select ‘Topic’ or ‘Queue’.
- User ID / Password: It is the User ID and password for Tibco by which the user can have the monitoring access. It is an optional field, which depends on the server.
- Source/Destination Server SSL Information: To enable SSL script, the user needs to select the SSL from the dropdown of connection. On selecting that, the user is required to provide the following details.
- SSL: It is used to decrypt client identity and is required if an identity file is set.
- Ciphers: It is an algorithm for encrypting and decrypting data. The user can either browse the file path or enter the file path manually. The user can provide multiple ciphers separated by a colon.
- Private Key File: It is a separate file that is used in the encryption/decryption of data sent between the server and the connecting clients. The user can either browse the file path or enter the file path manually.
- Trusted CA: It is the trusted certificates, which are data files used to cryptographically link an entity with a public key. The user can either browse the file path or enter the file path manually.
- Issuer: It is the client issuer file. The user can either browse the file path or enter the file path manually.
- Identity: It is the client identity file. The user can either browse the file path or enter the file path manually.
- Password: It is the password of the primary key file.
IBMMQ
If user selects JMS Vendor as IBMMQ, the following option as shown in below figure will be available.
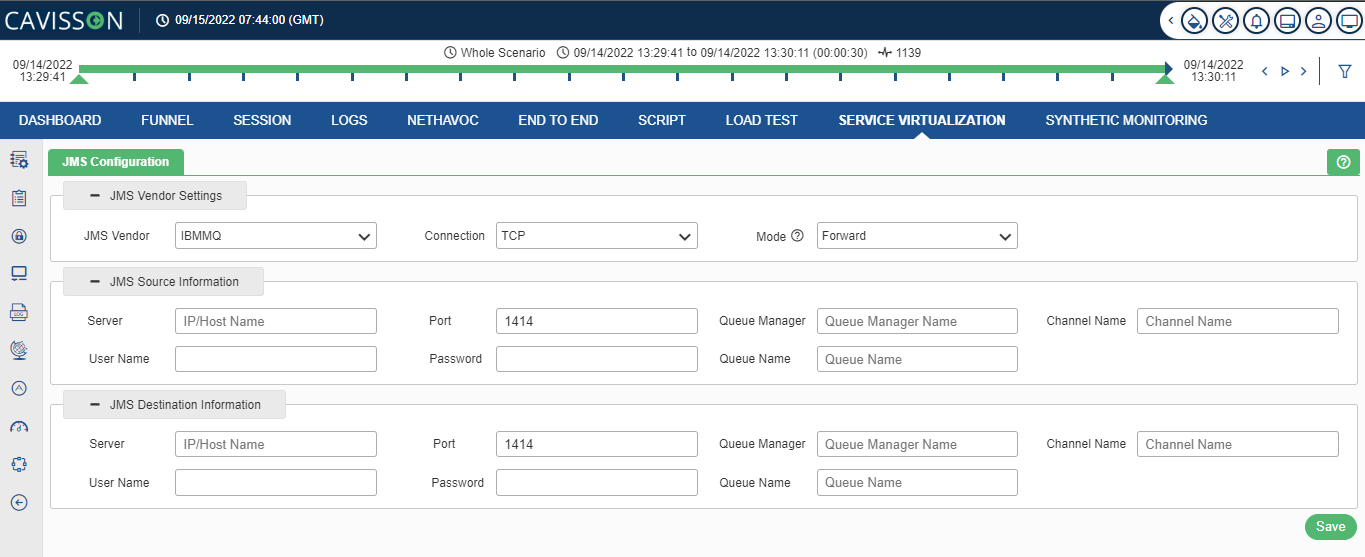
The user needs to provide the following inputs within JMS Configuration:
- Server IP / Host Name: It is the IBM MQ Server IP/Host name. It is a mandatory field.
- Port: It is the IBM MQ Server IP/Host name. It is a mandatory field.
- Queue Manager: It manages the resources associated with a queue that it owns. It is a mandatory field.
- Channel Name: It is the element used to transfer messages between queues. It is a mandatory field.
- Queue: It is responsible to hold the message until the receiver is ready. It is a mandatory field.
- User ID / Password: It is the User ID and password for IBM MQ by which the user can have the monitoring access. It is an optional field, which depends on the server.
KAFKA
If user select JMS Vendor as KAFKA, the following option as shown in below figure appears.
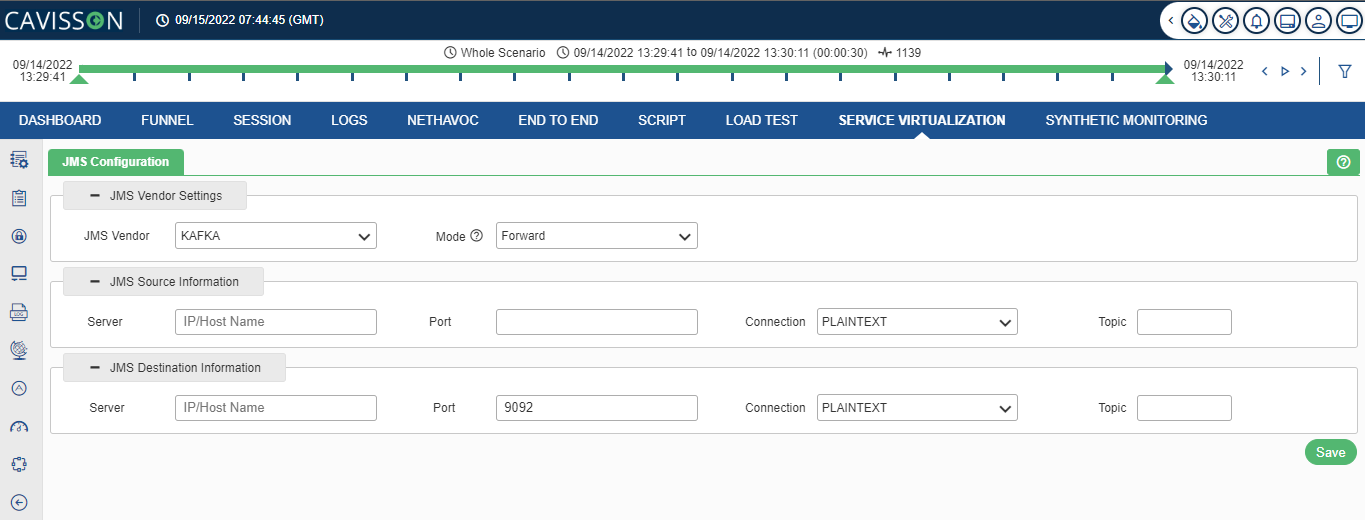
The user needs to provide the following inputs within JMS Configuration:
- Server IP / Host Name: It is the Kafka Server IP/Host name. It is a mandatory field.
- Port: It is the port where Kafka is listening. It is a mandatory field.
- Type/Messaging: (Topic/Queue) It is used as a message oriented middleware that is responsible to hold and deliver messages. It is a mandatory field.
- Consumer Group: It is a multi-threaded or multi-machine consumption from Kafka topics. It provides Kafka the flexibility to have the advantages of both message queuing and publish-subscribe models. A consumer group has a unique id. Each consumer group is a subscriber to one or more Kafka topics. It is a mandatory field on selecting ‘Consumer’ option.
- User ID/Password: It is the User ID and password for Kafka by which the they can have the monitoring access. It is an optional field, which depends on the server.
Connection Fault Settings
This feature enables user to do negative testing. This feature provides all the negative scenarios related to Connection fault. User can easily figure out the issues (if any) due to connection fault occur in the application. Click the Connection Fault Settings icon![]() to access the connection fault settings module as shown in figure below.
to access the connection fault settings module as shown in figure below.
Once user click the icon, the following screen opens.
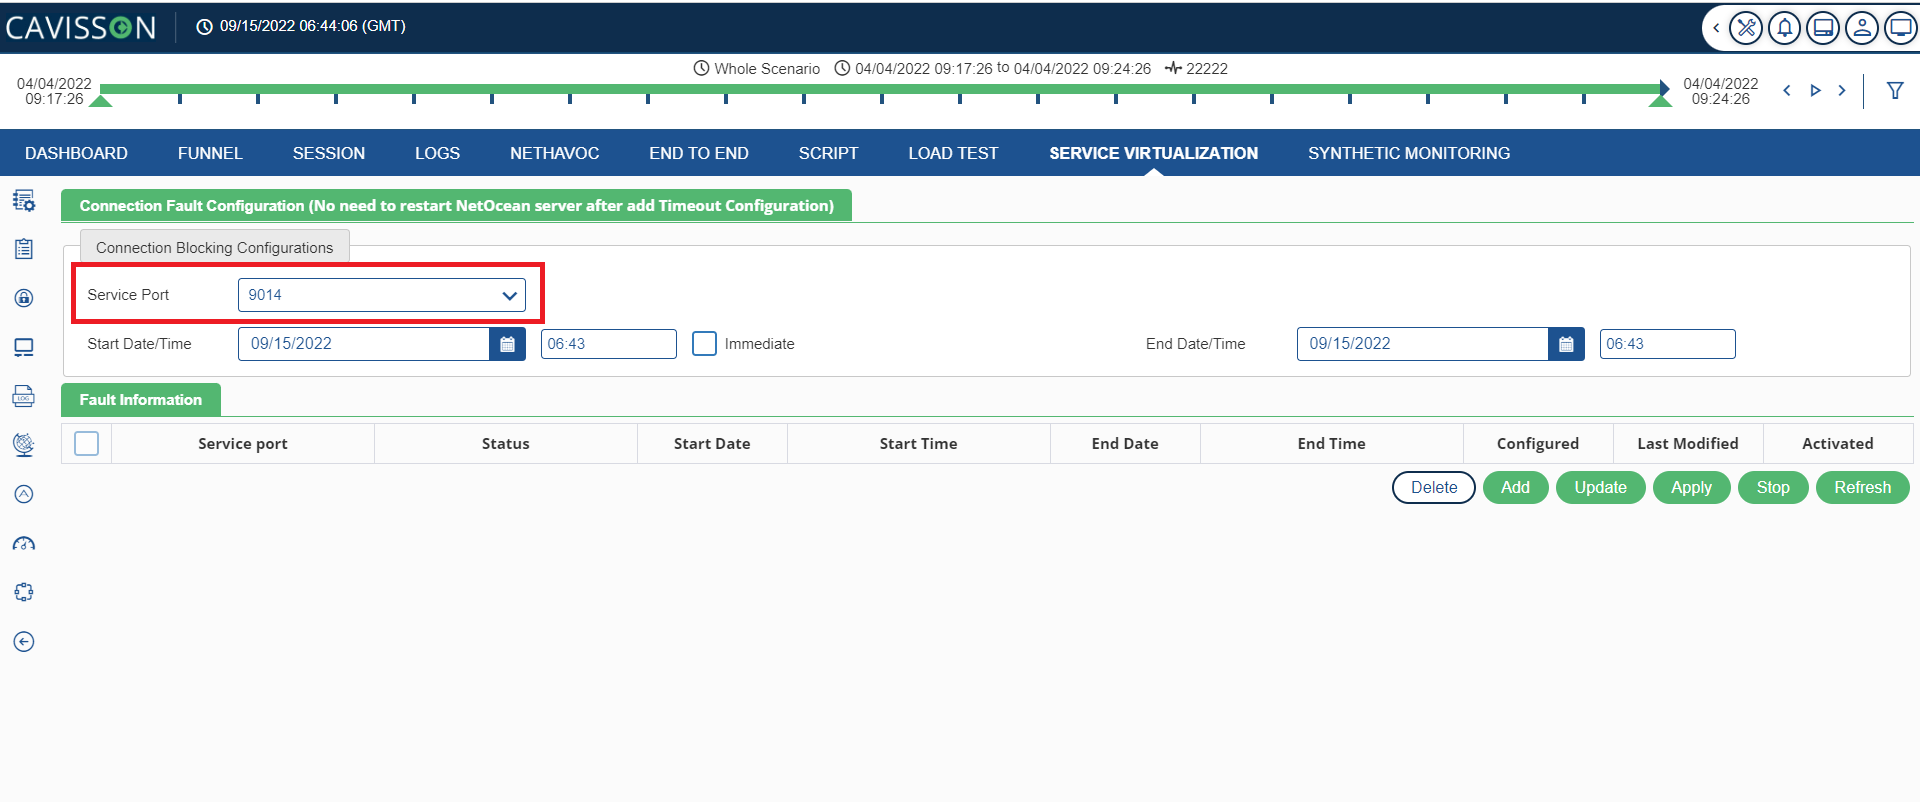
Select the port, which are available for TCP Drop (connection time out). Application points to these ports and continue the negative testing. User can start the job with the current time stamp or schedule it for future. Upon selecting the ‘Immediate’ option, the job starts after applying the changes. Upon scheduling the job, it starts on scheduled time after applying the changes.
After applying the changes by clicking the Apply button, first job will be processed at the current time and second job will be processed with the scheduled time. In addition, their Status changes from “Ready to Apply” to “Running”/ Scheduled” accordingly.
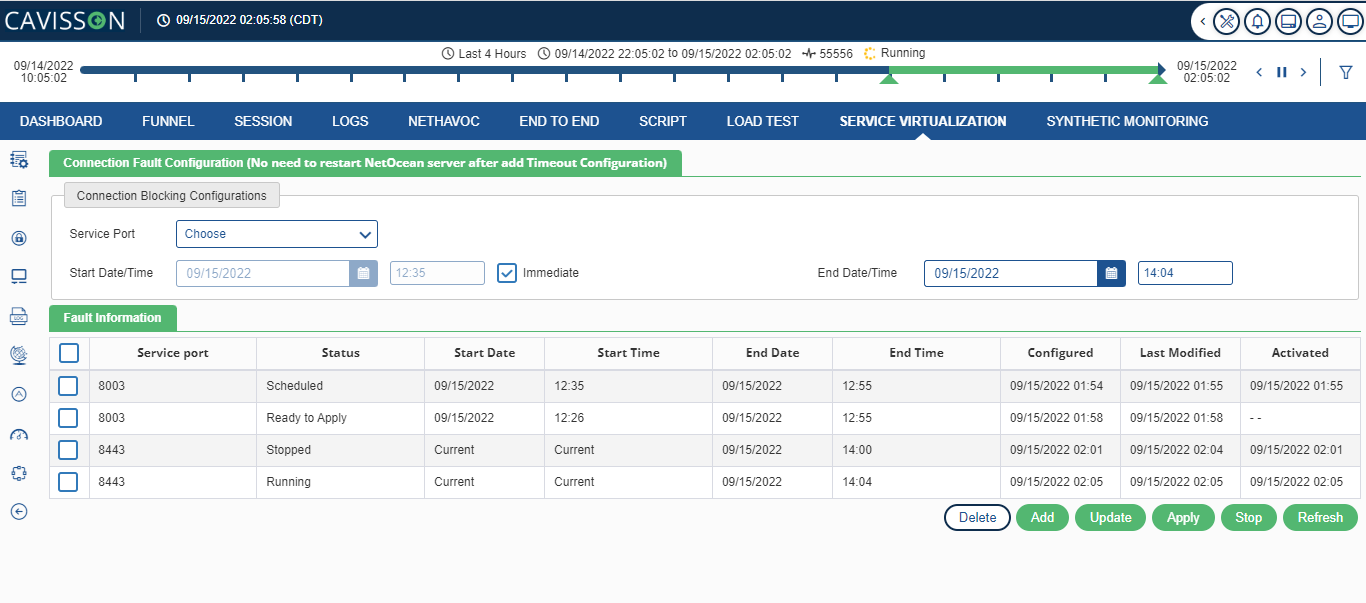
Note: If a connection time-out job is scheduled for the second time, the ‘used’ port is removed and only unused ports are displayed in the ports drop-down list.
Let us know check the details that are provided in the Fault Information table:
- Service Port: The service port that was used for timeout.
- Status: The status of the job. For example:
- Ready to Apply
- Applied
- Scheduled
- Running
- Completed
- Forced Stop
- Start Date: Start date of the job.
- Start Time: Start time of the job.
- End Date: End date of the job.
- Configured: The date and time when the specific port was configured for timeout.
- Last Modified: The timestamp at which any port configuration was updated/stopped, etc.
- Activated: The timestamp at which the port was put to ‘Applied’ state.
- User Actions
- Add: This is used to add a port to refuse the connection. To add a port, click on the
 Add button.
 - Update: Allow to update scheduled job only if the scheduled job is in “Ready to Apply” status. To update a scheduler, click on the Update
 button.
 - Delete: This deletes the scheduled job only if the scheduled job status is “Ready to Apply” or “Completed”. To delete a schedule job, click on the
 Delete button.
 - Stop: This stops the scheduled job only if the scheduled job status is “Scheduled” or “Running”. To stop the scheduler, click on the
 Stop
Stop - Apply: Apply the changes if the scheduled job status is “Ready to Apply”. To apply the changes, click on the
 Apply
Apply - Refresh: To refresh the connection fault settings, the user can click on the Refresh
 icon.
icon.
Note: Once the user has entered all the values and click on the Add ![]() button, the details will be displayed on the Fault Information window.
button, the details will be displayed on the Fault Information window.
- Refresh: Refresh the table to reflect recent changes.
Following is the template of on request callback method:
#include <stdio.h>
#include <time.h>
#include <stdlib.h>
#include <string.h>
#include “/var/www/Service Virtualization Server/include/Service Virtualization Server_log.h”
#include “/var/www/Service Virtualization Server/include/Service Virtualization Server_string_api.h”
#include <errno.h>
#include <unistd.h>
/*——————————————-
Name: MyService_after_request_callback
Purpose: This method is called on just before sending the response of the service.
Input: None
Return: None
————————————————*/
void MyService_after_request_callback()
{
}