The configure monitor page shows the following monitors:
- Configured Monitor by Technology
- Available Technology
- Cloud Integration
- APM Integration
- Kubernetes
- Custom Monitors
- Other Monitors
Configured Monitors by Technology
This section shows all the monitors which are already configured, running, and failed as shown in the below figure.

Top Panel
The top panel consists of the following:
- Technology – It shows the number of available configured technologies.
- Monitors–
- Running– It is the number of monitors running.
- Failed– It shows the number of monitors which failed.
- Search: To search the available technology.
- Tiers: Tier is a logical entity that constitutes a high level grouping of individual nodes and nodes can be individual servers, app pool or JVM’s. The following options can be selected from the drop-down which are given below:

- All Tiers: It is used to see all the monitors which are configured in All Tiers.
Note: In this option, the users can see the available tiers, to monitors you can click on the tier drop-down window and select the required tier from the given options.
Configured Technology
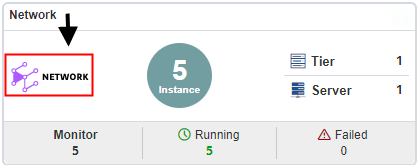
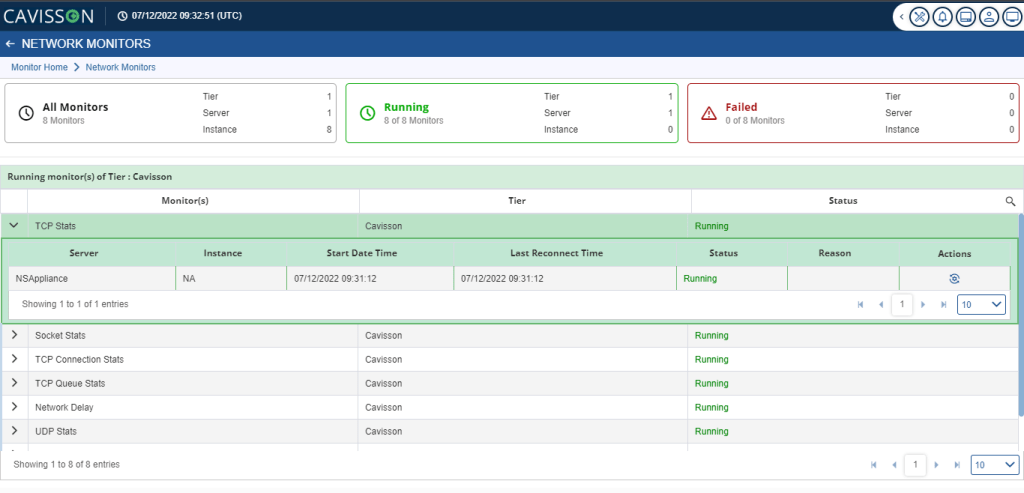
Let us take an example of Technology- Network as shown in below figure:


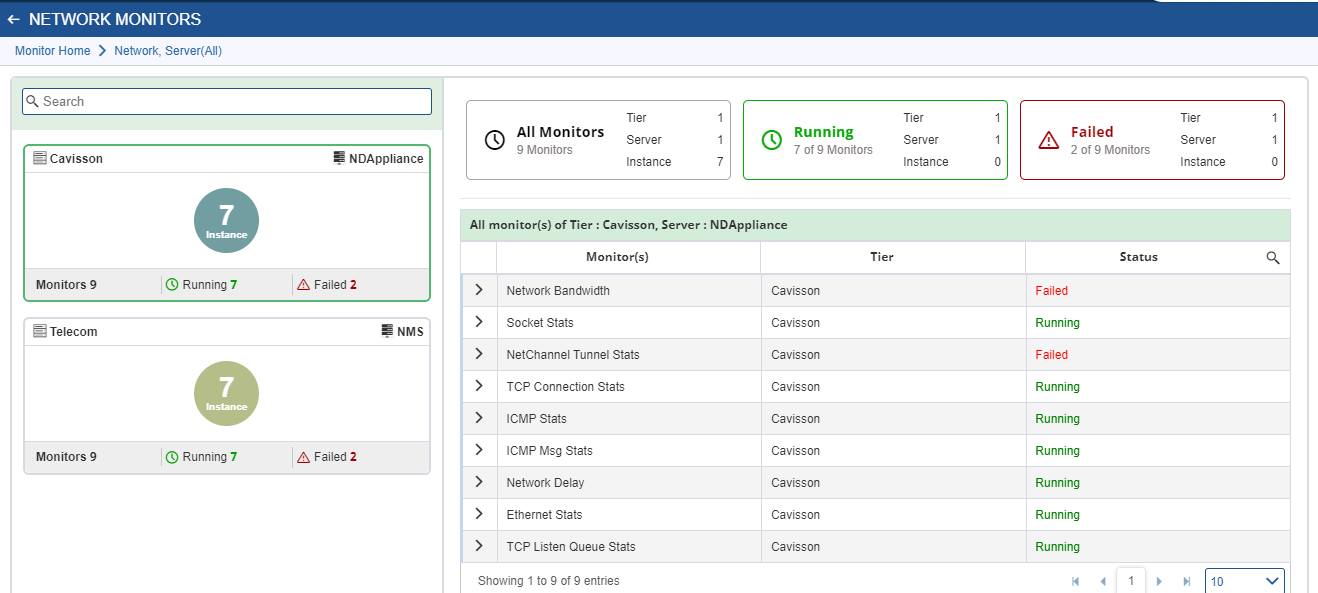
Tier
Tier is basically represented as a combination of servers i.e servers that are arranged in row and column format to serve the user.
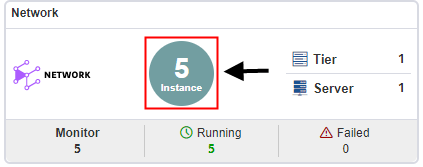
Instance
The instance is a process or specific running copy of a software application or service on a server. It is a unique copy of the software that is running independently and may have different configurations.
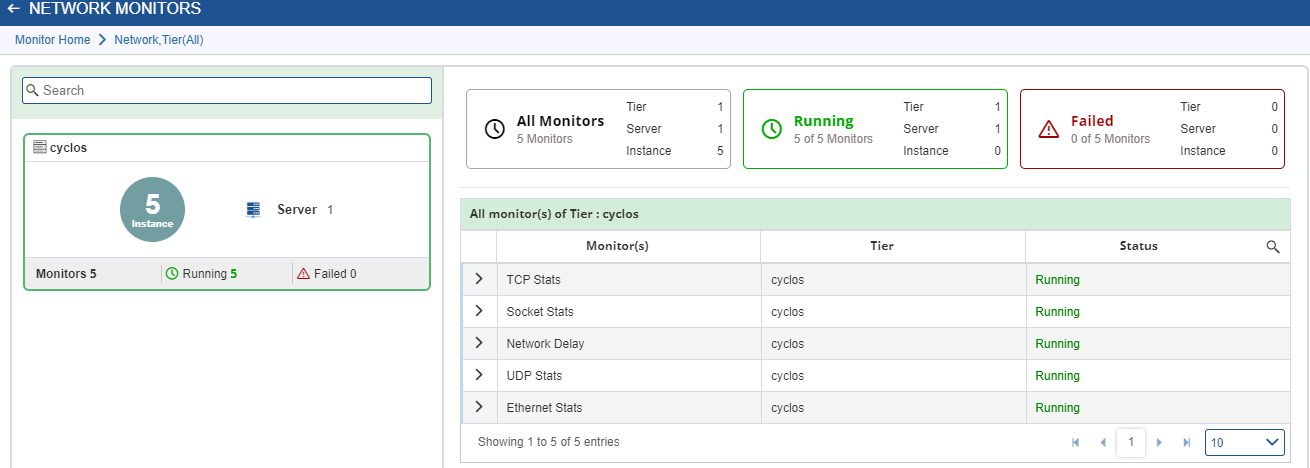
If user click in monitors, he will get the details of that monitors.
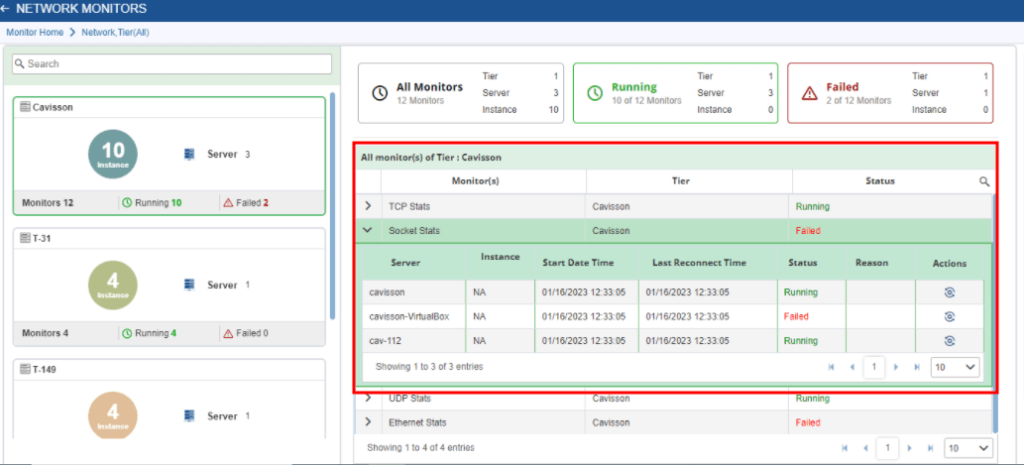
The following columns appear when we click the icon:
- Server: Shows the server name of that monitor.
- Instance: It is the user-defined name in the Tier > Server hierarchy.
- Start Date Time: Shows the start date and time of the server.
- Last Reconnect Time: Last time when the server was reconnected.
- Status: Shows the status of the server- Running or failed.
- Reason: The reason if any for the failure.
- Actions: Shows the actions which can be taken for the server.
Cavisson Infra Monitoring
Cavisson Infra monitoring is for monitoring of all Cavisson Servers and Agents. It also includes collecting a few server signatures of Application servers like Process, Disk, and Memory. It is enabled by default and should not be disabled. To access this, click on the icon ![]() as shown in figure below.
as shown in figure below.
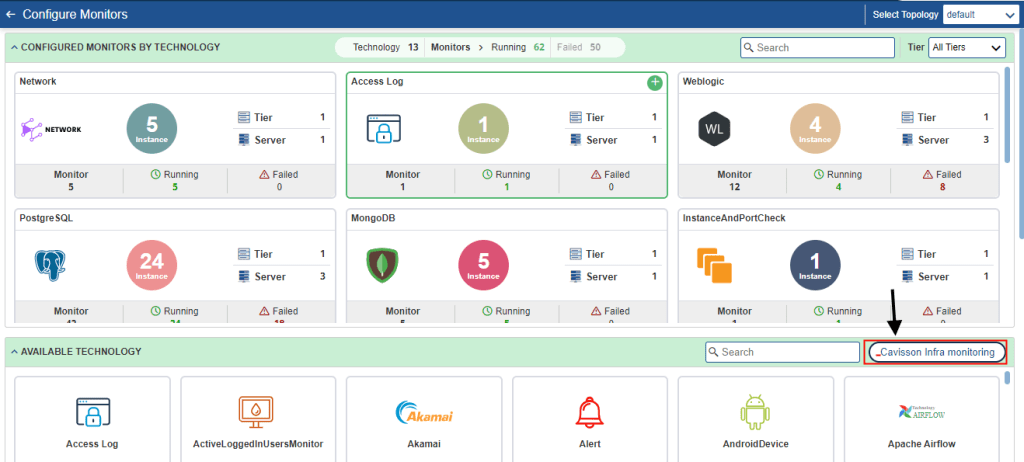
Once you click the icon, Cavisson Infra Monitoring Page opens as shown in the below figure.

In the Cavisson Infra Monitoring Page, there are the following list of monitors:
- Cavisson Appliance Monitoring
- Cavisson Tomcat Monitoring (For Monitoring Session only)
- Cavisson MongoDB Monitoring (For Monitoring Session only)
- Cavisson Postgres Monitoring (For Monitoring Session only)
- Cavisson Machine Agent Monitoring
- Generator Monitoring (For NetCloud Tests)
- NetOcean Monitoring
- Application Server Signatures
- Copy Generator Log Files To Controller (For NetCloud Tests)
In the top right corner, there are the following option:
- Save
- Download

Click the Save button to save the settings in Infra monitoring. You can also download the infra-monitoring settings by clicking the ![]() icon.
icon.
If you expand any of the infra monitoring by clicking the ![]() icon, it will show the already configured monitors.
icon, it will show the already configured monitors.

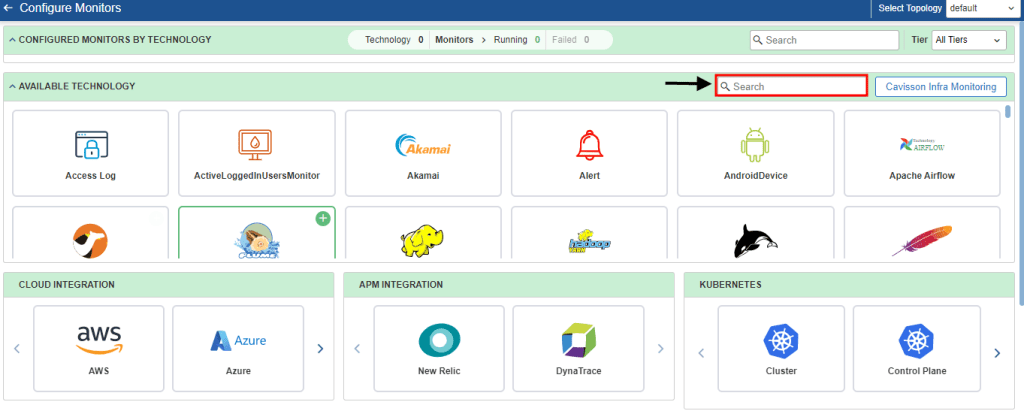
Available Technology
Available technology shows all the technology available. If you want to add a new technology for configuration, you need to click the add button in the top right corner of a particular technology.
Add New Technologies
When a user needs to add new a technology or monitor, then they have to click on the ![]() ADD button of the desired technologies like: Network, Access Log, Alert, Window Based Monitors, etc.
ADD button of the desired technologies like: Network, Access Log, Alert, Window Based Monitors, etc.
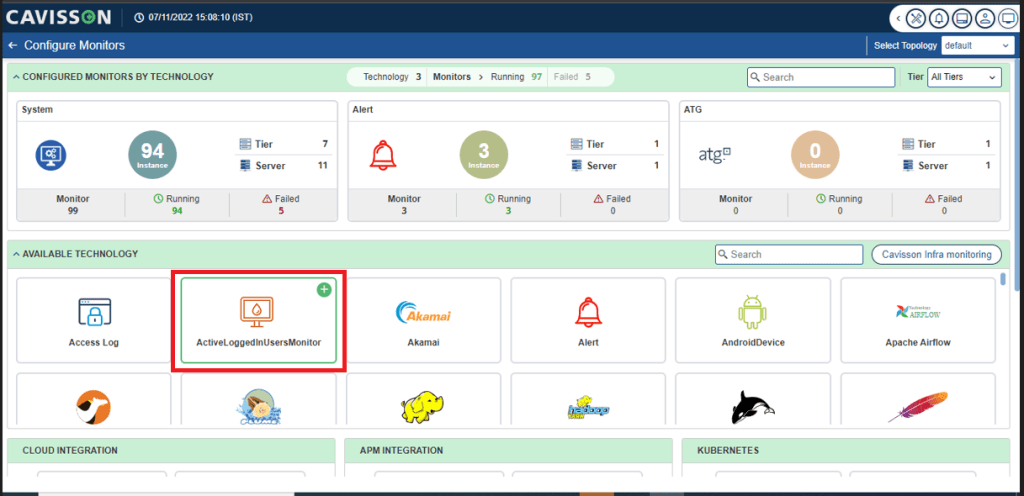
For Example: Network Monitor
Cavisson’s network monitoring component constantly monitors a network for slow or failing components, visualizes the networking data, and notifies the stakeholders (via: email, SMS, or other alarms) in case of outages or performance spikes.
- When a user goes to the Monitor home page UI, then selects the network monitor.
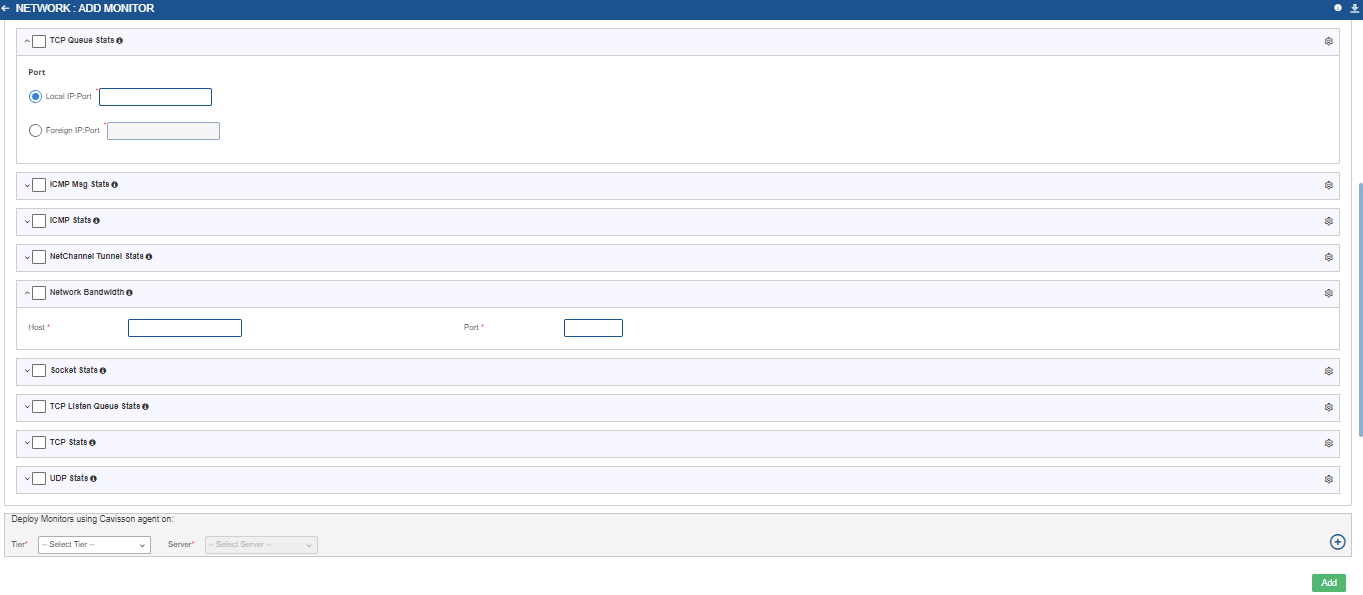
- On selecting the network monitors, it will be displayed on the configuration UI.
- The user can start editing the configuration according to the requirements. After providing the Tier-Server configurations, then the user will be able to add the monitor.
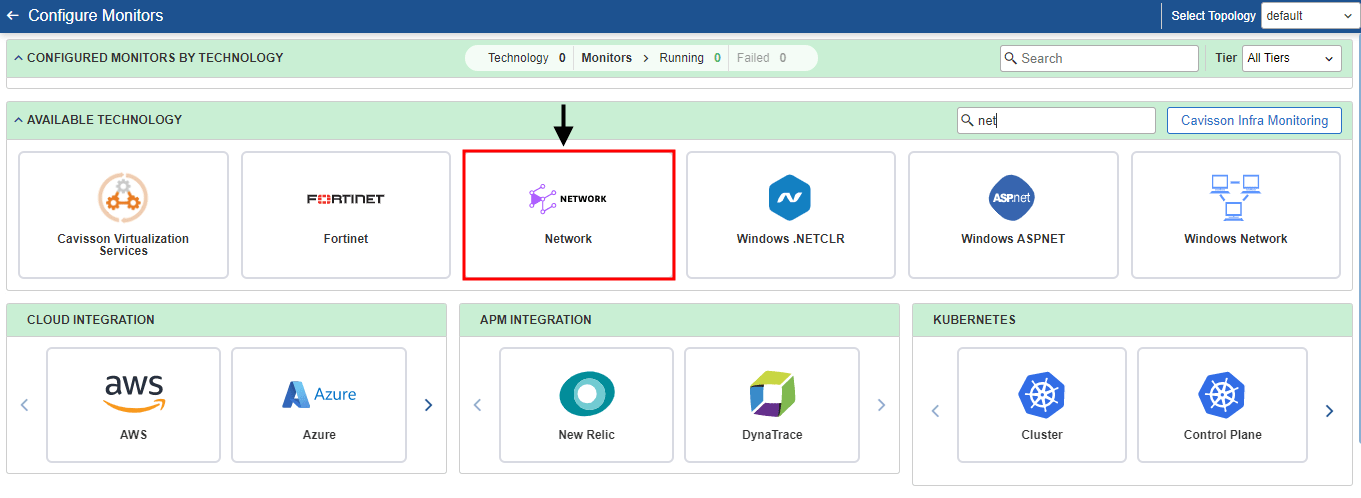
Once you click the add button, the following page opens as shown in the figure below.
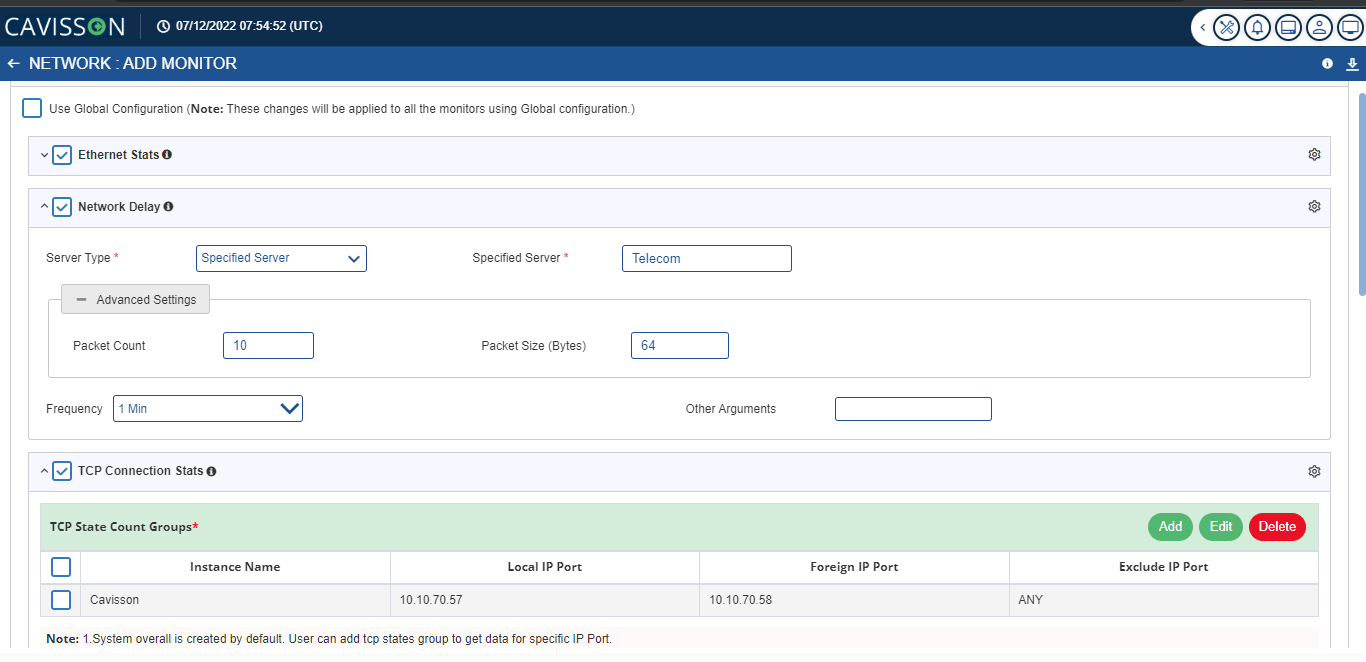
Notes:
- If a user wants to configure a monitor, they can refer to the Help Section
 by clicking on the Help Icon provided on the screen. User can also download the JSON of the configuration by clicking on the Download
  button.
 - Once the user has filled all the fields, the user has to click on the Add
 button to add the details. Upon adding the details, it will show in the below table which contains the following information:
- Tier Server Information: It will show on which tier and server the monitor is being configured.
- Monitors: It will show the type of monitors which are being configured by the user.
- Actions: In actions, the user can either perform edit or delete operations. To edit the table, the user has to click on the Edit To
 delete a table, the user has to click on the Delete
  icon.
icon.
After adding the monitor, then it will redirect the user to the configured monitor UI and the user will be able to see the configured monitor.
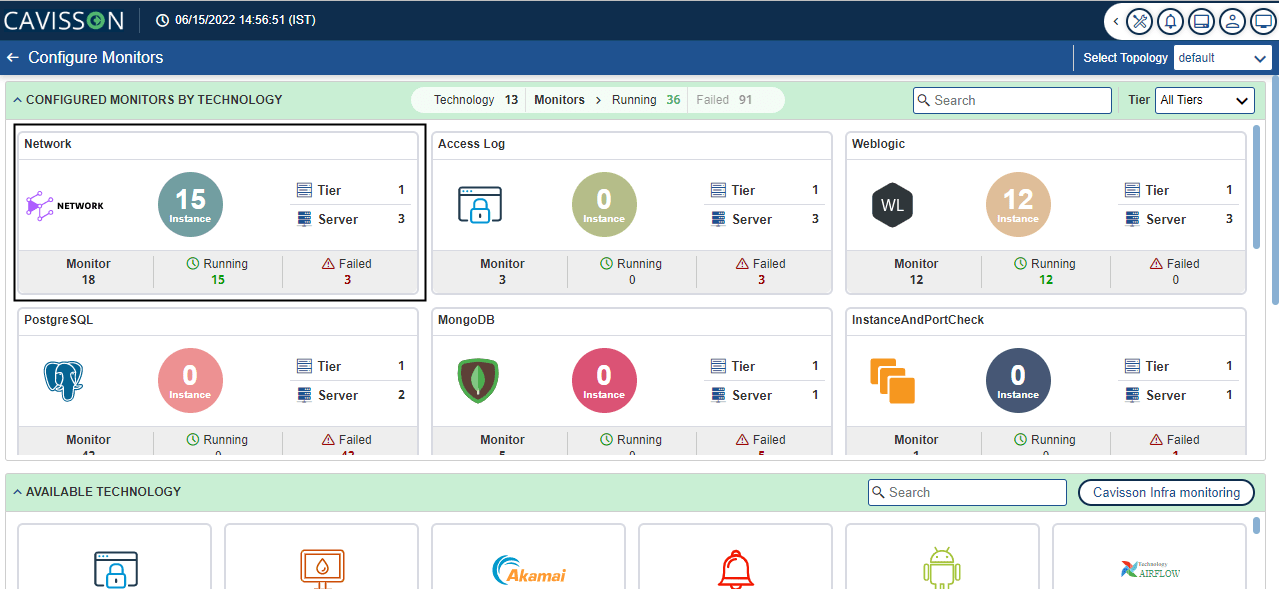
In configured monitors, the user will be able to see the number of tiers, servers, and instances as well as the total number of all monitors: running monitors and failed monitors.
Note: While applying Network Delay Monitor, there was no option for “All server of specified Tier” in the server type. Now new option “All Server” is added in dropdown for NetworkDelayEx monitor.
Cloud Integration
This section guides through the integration process of Cloud Monitors of AWS/Azure/GCP with Net Diagnostics Appliance. Cavisson monitoring agent provides you full-stack visibility into the performance of applications, databases, and micro services within a container environment. There are two agents, one is a machine agent (CMON) and another is an application agent (ND Agent).
When the user goes to the Monitor home page UI, then select the AWS cloud integration monitor.
- On selecting the AWS cloud integration monitors, it will be displayed on the configuration UI.
- Generating Keys (in case of non-availability)
You can also generate keys (access key and secret keys) in case you do not have them:
AWS: Open Console, search IAM, create a user with specific access, generate a password. Once you end with all the settings, it generates Access Keys and Secret Keys. Save them at a secure place.
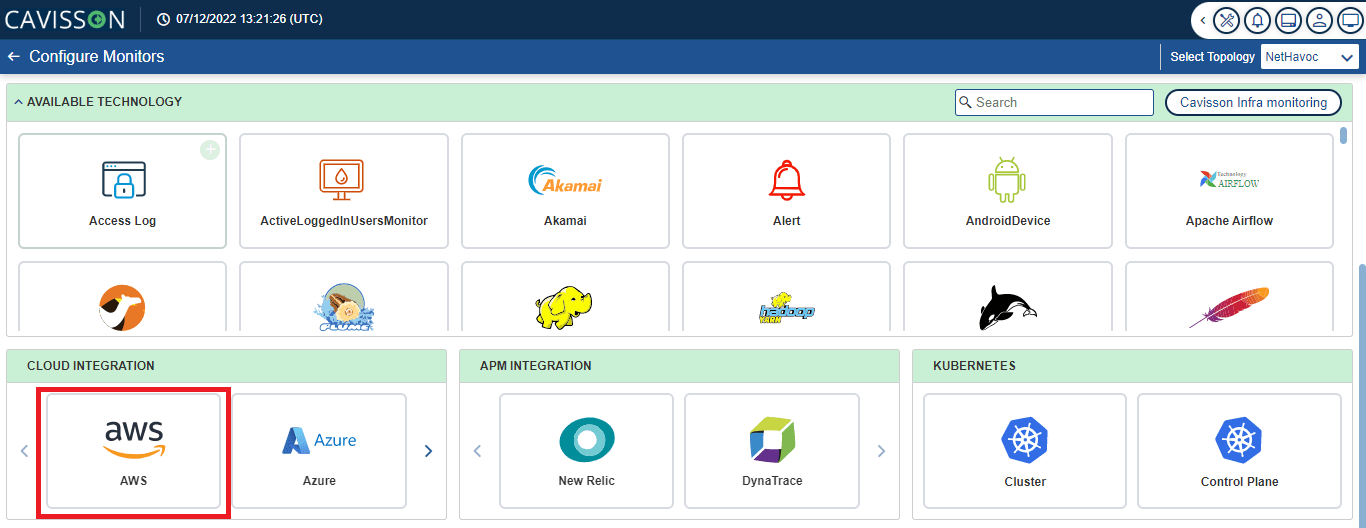
Once you click the AWS icon, as shown in the above picture, the below shown window opens.
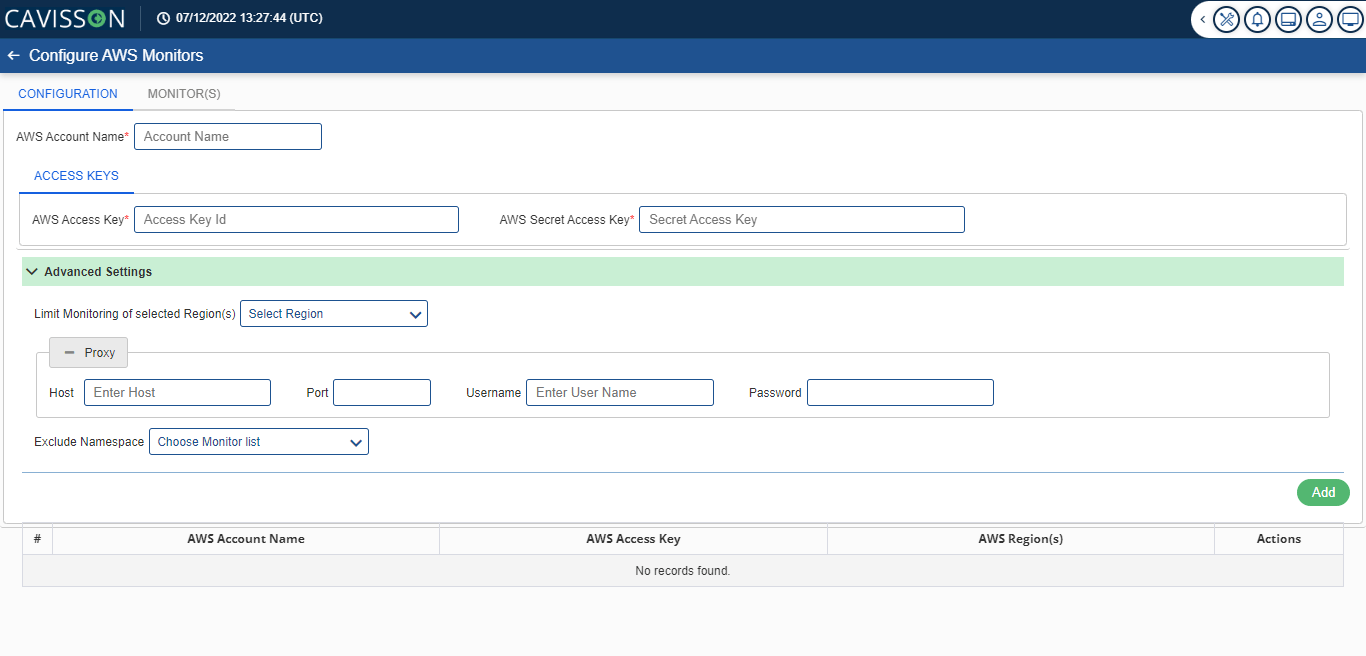
Notes:
- If a user wants to configure a monitor, they can refer to the Help Section
 by clicking on the Help Icon provided on the screen. User can also download the JSON of the configuration by clicking on the Download
- Once the user has filled all the fields, the user has to click on the Add
 button to add the details. Upon adding the details, it will show in the below table which contains the following information:
- Tier Server Information: It will show on which tier and server the monitor is being configured.
- Monitors: It will show the type of monitors which are being configured by the user.
- Actions: In actions, the user can either perform edit or delete operations. To edit the table, the user has to click on the Edit
 To delete a table, the user has to click on the Delete
  icon.
icon.
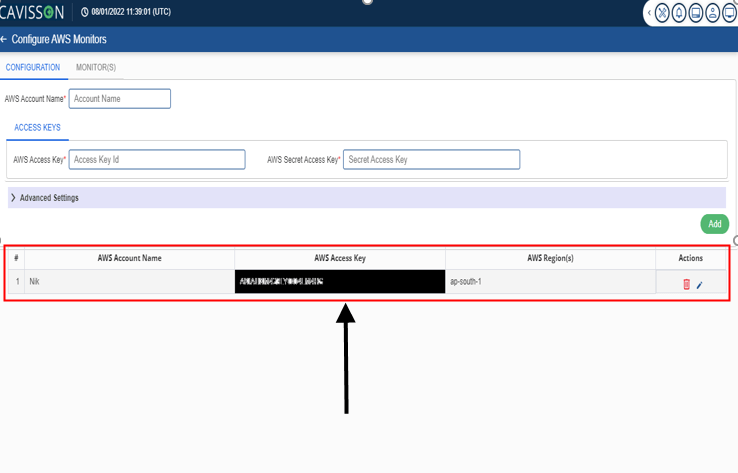
After adding the monitor, then it will redirect the user to the configured monitor UI and the user will be able to see the configured monitor as shown in the below figure.
APM Integration
In the fields of information technology and systems management, Application Performance Management (APM) is the monitoring and management of the performance and availability of software applications. APM strives to detect and diagnose complex application performance problems to maintain an expected level of service.
Cavisson provides two types of APM Integration, i.e.: New Relic and Dynatrace.
For example–
To access Dynatrace in APM integration go to the Monitor home page UI, then select Dynatrace as shown in the below figure.
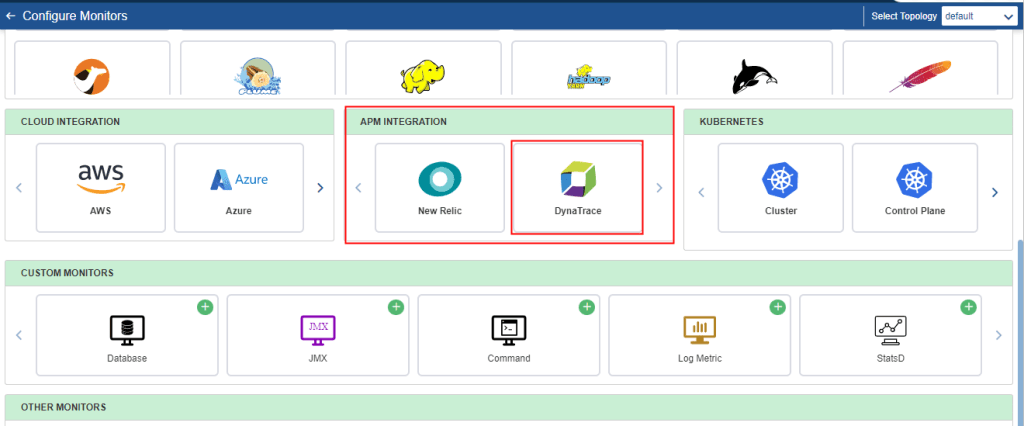
- On selecting the Dynatrace monitors, it will be displayed on the configuration UI.

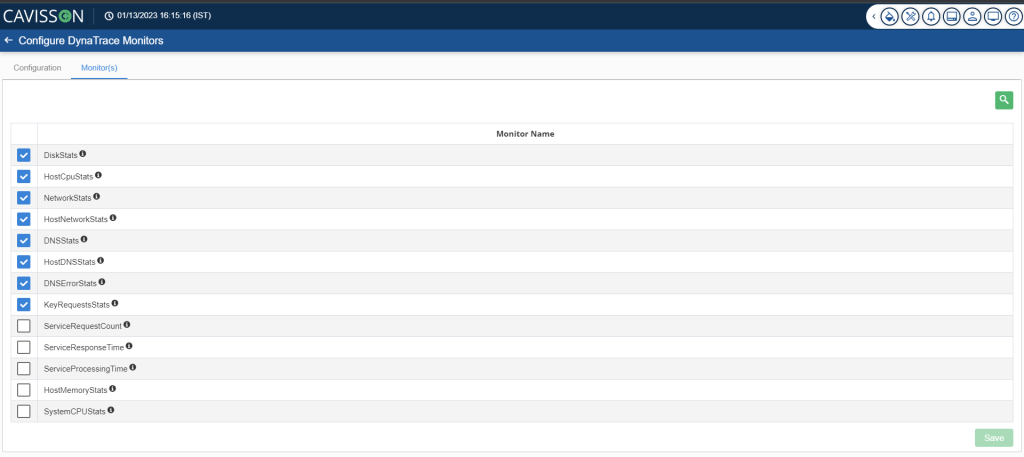
After adding the monitor, then it will redirect the user to the configured monitor UI and the user will be able to see the configured monitor.
Kubernetes
Kubernetes is a portable, extensible open-source platform for managing containerized workloads and services that facilitates both declarative configuration and automation. It has a large, rapidly growing ecosystem. Kubernetes services, support, and tools are widely available.
Key Features
- Application Performance Management (APM) solution for Kubernetes Cluster
- Monitoring all components of Kubernetes cluster including Node, Pod & Containers.
- CPU, Memory, & Disk I/O monitoring for Containers & host.
- Network Throughput Monitoring for each pod & host.
- JMX based Monitoring for Java applications running in containers.
- Provides a simple and intuitive view of live application traffic
- Allow users to identify bottlenecks and the areas where they exist.
- ND powerful agent engine
- Covers all popular programming languages (NodeJS, Java, .Net) and enterprise platforms,
- Provides deep diagnostics of application at class, method, DB Queries, Hotspots etc.
- Correlates performance metrics captured by different sources to build a holistic view
- ND’s unmatched APM platform
- Provides complete visibility of distributed applications with auto-discovered end-to-end business transactions,
- Dynamically alert baseline performance,
- Quickly isolate and resolve production issues, and
- Enhance development & ops collaboration
Cavisson provides three types of Kubernetes: –
- Control Plane: The control plane’s components make global decisions about the cluster as well as detecting and responding to cluster events.
- Cluster: Kubernetes cluster consists of a set of worker machines, called nodes that run containerized applications. Every cluster has at least one worker node. The control plane manages the worker nodes and the Pods in the cluster.
- Kubernetes Prometheus: Prometheus is an open-source systems monitoring and alerting toolkit with a dimensional data model, flexible query language, efficient time series database, and modern alerting approach.
Prometheus collects metrics from monitored targets by scraping metrics HTTP endpoints on these targets. Since Prometheus also exposes data in the same manner about itself, it can also scrape and monitor its health.
For example-
To access Cluster in Kubernetes, go to the Monitor home page in the UI, then select the Cluster as shown in the below figure.
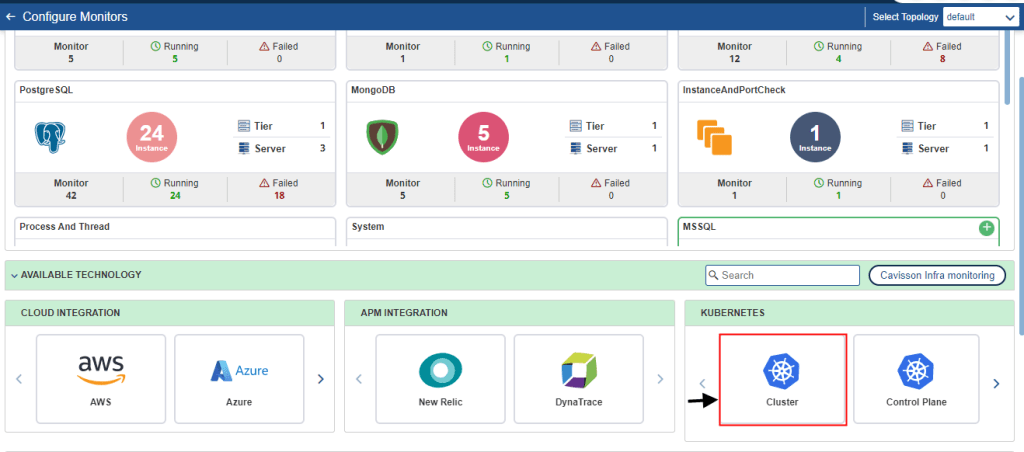
On selecting this, the Kubernetes Cluster Configuration page opens as shown in the below figure.
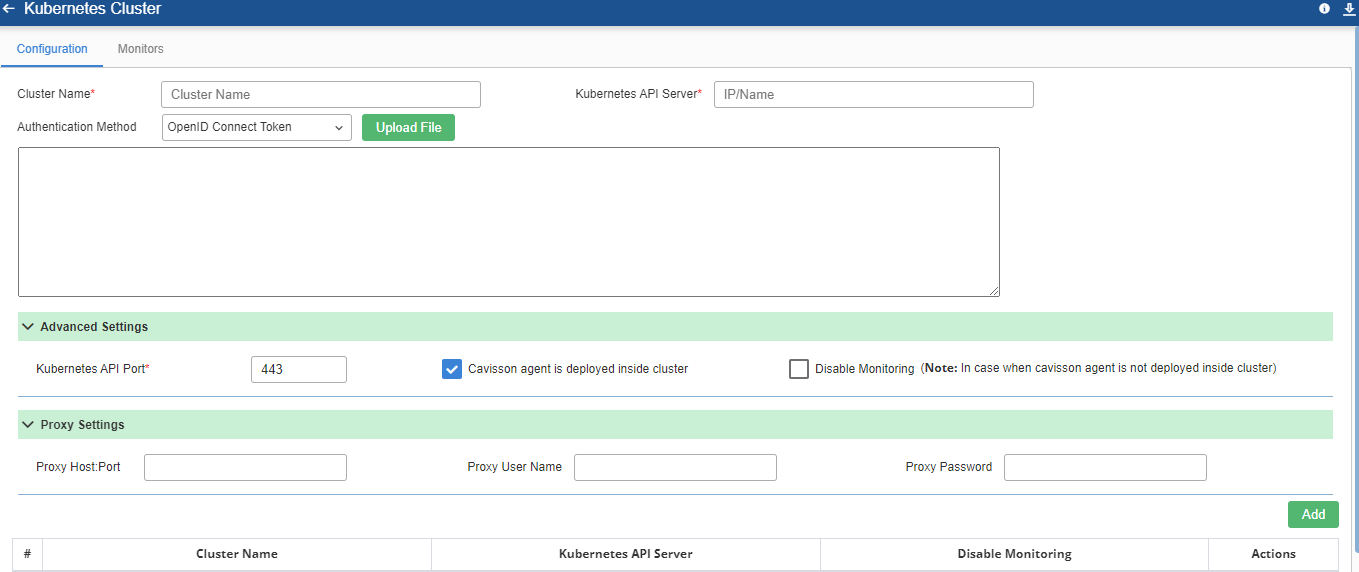
To configure the Kubernetes Cluster Monitors, fill in all the available fields and click Add button on the page. After clicking Add button following details are available in tabular form on the configuration Page.
- Cluster Name
- Kubernetes API Server
- Disable Monitoring
- Actions
If the user clicks the ![]() icon, list of the following monitors is displayed:
icon, list of the following monitors is displayed:
- Kubernetes Node Cpu Memory Stats
- Kubernetes Container Process Stats
- Kubernetes Cluster Stats
- Kubernetes Node Resource Capacity Stats
- Kubernetes Pod Stats Per Name Space
- Kubernetes Pods Stats Per Node
- Kubernetes Container File System Stats
- Kubernetes Deployment Replica Stats
- Kubernetes Pod Network Stats
- Kubernetes Pod Discovery
- Kubernetes Pod Discovery
- Kubernetes Container CPU Stats
- Kubernetes Auto Scale Config Stats
- Kubernetes Services Stats
- Kubernetes Service Status
- Kubernetes Cron Job Stats
- Kubernetes Node CPU Stats
- Kubernetes Node Memory Stats
- Kubernetes Node Block Io Stats
- Kubernetes Container Stats
- Kubernetes Node Device Stats
- Kubernetes Process Stats
- Kubernetes Node Network Stats
- Kubernetes Pod Memory Stats
- Kubernetes Resource Quota Stats Per Name Space
- Kubernetes Daemonset Stats
- Kubernetes Deployment Rolling Update Stats
- Kubernetes Persistent Volume Claim Stats
- Kubernetes Replication Controller Stats
- Kubernetes Pod Volume Stats
- Kubernetes Pod State Stats
- Kubernetes Container State Stats
- Kubernetes Node Usage Stats
- Kubernetes Limit Range Stats
- Kubernetes Replica Set Stats
- Kubernetes CPU Memory Container Stats
- Kubernetes Container Cpu Stats
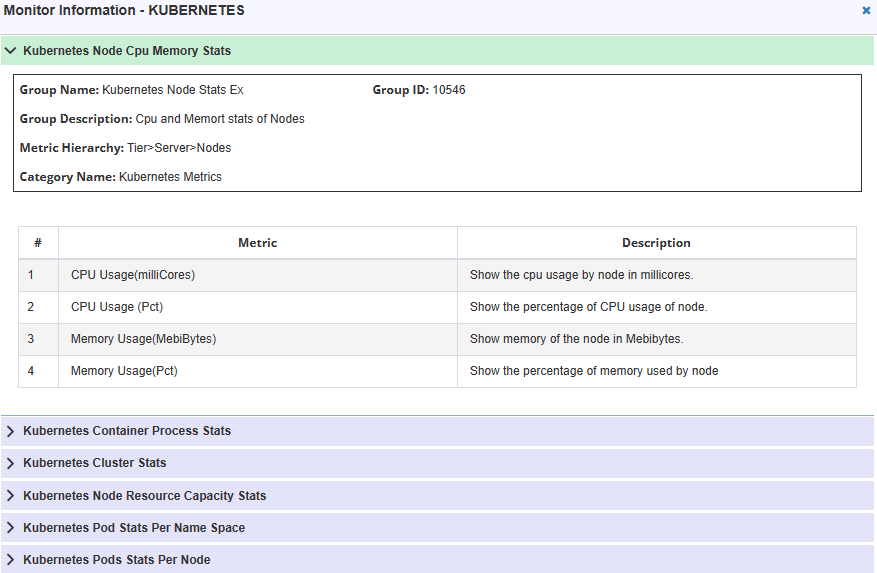
If the user clicks button on any of the monitors, it expands and shows the metrics and their description as shown in the above figure.
If you click the ![]() icon, it helps in downloading the configuration.
icon, it helps in downloading the configuration.![]()
Custom Monitor(s)
Custom monitors are used for grouping monitoring metrics that are relevant in one single dashboard. They are used for showing the data points, graphs, and specific metrics which are important for an application.
Log Metric Monitor
This monitor is used to configure NetForest monitors. ND agent calls NF REST APIs to get the data and this data is stored in RTG. This monitor is always applied on ND appliances, that is, even if you enable this monitor for any tier, CMON of ND appliances is used to get data from NF. This is done as CMON of different tiers might not have connectivity with NF.
To access this monitor, select Log Metric Monitor from the ‘Custom Monitor(s)’ as shown in the below figure.

The ‘Available Log Metric Monitor(s)’ window is displayed as shown in the below figure.

Here, you can view the list of available NF monitor(s). You can view the details such as Monitor Name, Technology, Metric Group Name, Metric Group Hierarchy, and Query.
Note: You need to configure ‘Log Metric Global Settings’ before adding a ‘Log Metric Monitor’.
Configure Log Metric Global Settings
Click the ‘Log Metric Global Settings’ button at the upper-right corner. The Global Settings window is displayed.
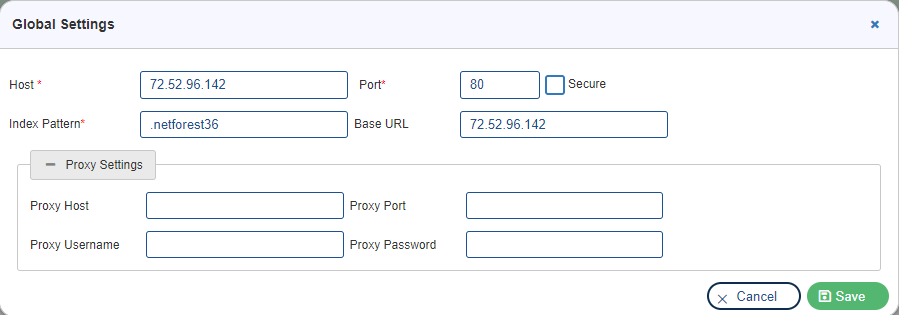
Provide the following parameters, and then click Save:
- Host: The default NF host is configured in ND.
- Port: NF UI port.
- Secure: Enable this check box.
- Base URL: It is the consistent part or the root of your website’s address.
- Index Pattern: Provide an index pattern, for example, ‘*’.
- Proxy Settings: Host, port, username, and password.
Add New Log Metric Monitor
To add a new Log Metric monitor, click the Add Log Metric Monitors button. This displays the configuration window.
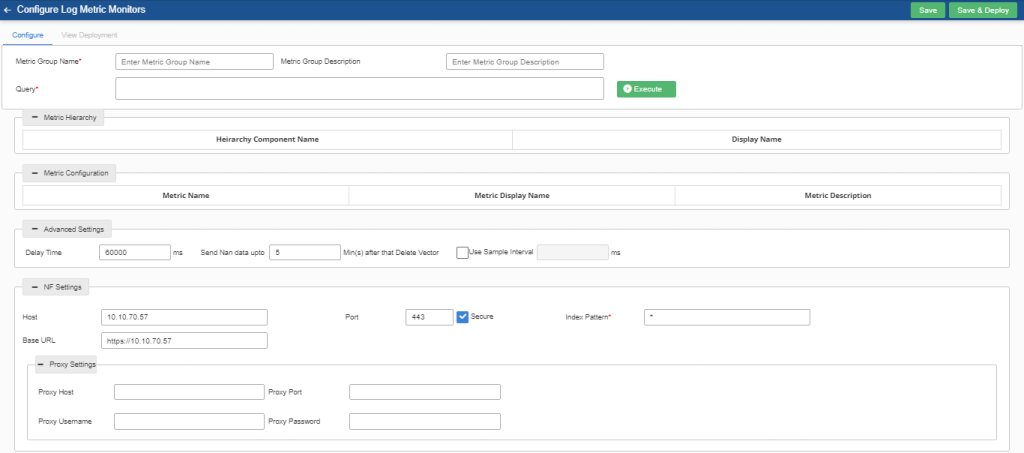
Provide the following details, and then click Save:
- Specify the metric group name and group description. This is needed for the creation of GDF.
- Enter the Monitor name and NF query. If you want to apply any grouping or bucket or metric aggregation, specify that in the query. Based on this grouping, metadata is sent by NF query output and the same is used to create the GDF metadata.
- You can select a saved NF query. On selecting this, the NF saved query is displayed in the query text box where you can edit this query.
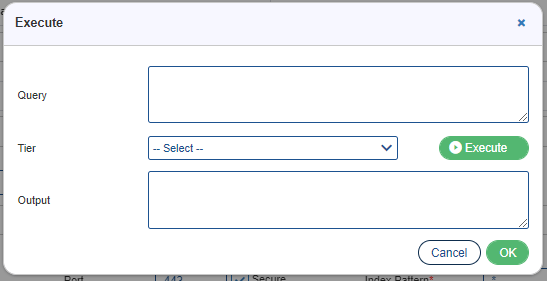
- Clicking the ‘Execute’ button opens a dialog box where you need to select a tier for which the query must be executed. Based on the output of the query, the hierarchy (from metadata) and list of metrics are derived. These are used to create the GDF. Do not specify ‘Tier’ in the NF query.
- In the ‘Metric Configuration’ section, you can edit the metric name and description. By default, the metric name and graph description are the same as field name.
- In the ‘Advanced Settings’ section, specify the following parameters:
- Delay time (in ms).
- Send Nan data upto min(s) after that delete vector.
- Use Sample Interval (ms).
- The NF Settings are the same as Global Settings.
Other Monitors
Other monitors are those monitors that the user can deploy apart from the Technology based, Cloud based, and Custom based monitors. The user can configure the following types of other monitors which are listed below:
- Check Monitor
- Server Signature
- Batch Jobs
Batch Jobs
Batch Jobs are used to execute some jobs before the test, during the test run, or after the test is over. It uses the Check Monitor framework of NetStorm and CMON.
- Batch Group is used to specify one or more batch jobs.
- Batch jobs may be run on different server machines.
- Batch Jobs run in pre-test run, during the test run, and post-test run.
- Batch Jobs which run during tests have the option to repeat.
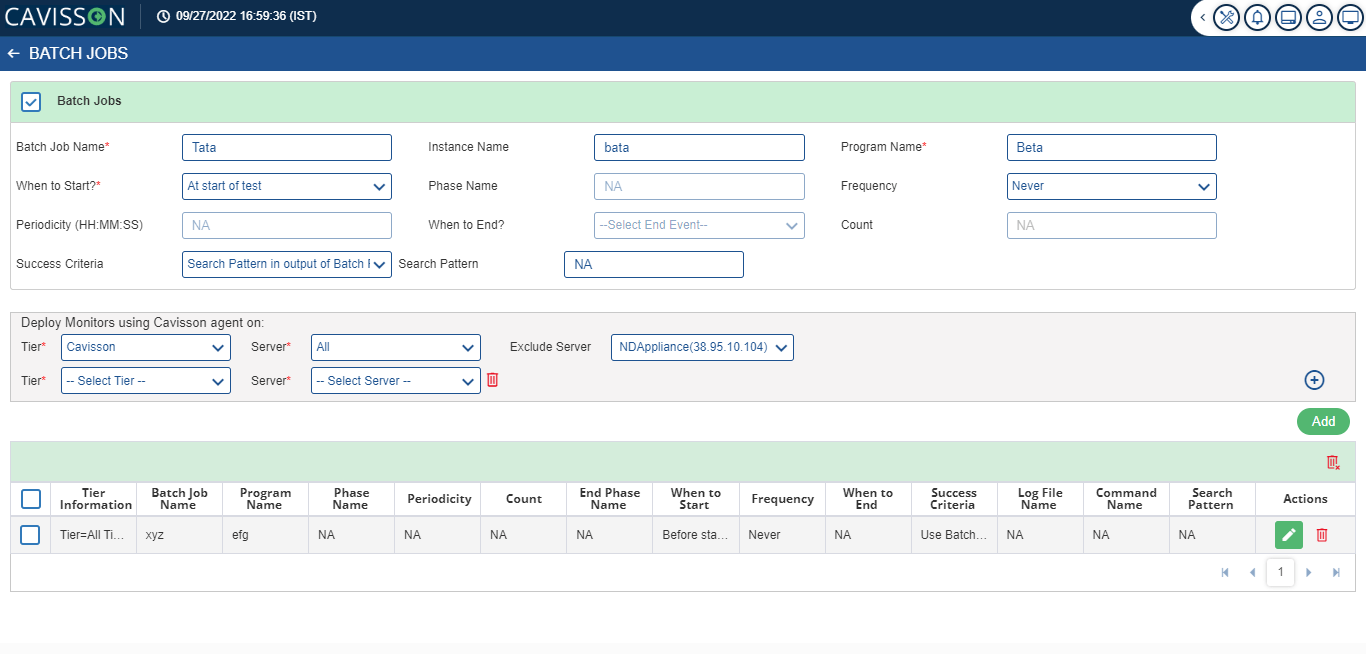
Run Batch Job Event
NetStorm runs Batch Jobs before, during, and after the test run. The following events are supported:
- Before: Before the start of the test.
- After:
- At start of test.
- On start of a phrase
- End: At end of test.
In Batch Jobs we have the following fields:
- Batch Job Name: This is the name which the user has provided for the batch job.
- Instance Name: This is the name that the user has provided for the instance.
- Program Name: This is the name of the program which is to be executed.
- When to Start: This field indicates the start time for the job. It has the following options:
- Before start of test: If the user selects this option, then the batch job will be executed before the start of the test.
- At start of test: If the user selects this option, then the batch job will be executed at the start of the test.
- On start of a phase: If the user selects this option, then the batch job will be executed on starting of a phrase.
- At end of test: If the user selects this option, then the batch job will be executed at the end of the test.
- Phase Name: This field indicates the name of the phase. This option will only be enabled if the user selects the On start of a phase
- Frequency: This field indicates when will the batch job will occur. This option will only be enabled if the user selects the On start of a phase and At start of test
- When to End: This field indicates when to end the test. It will only occur when the user selects the following: At Start of Test and On Start of a Phase.
- Periodicity: This field indicate which periods the test will run. It will only occur when the user selects the following: At Start of Test and On Start of a Phase.
- Success Criteria: This field is used for indicating the criteria for success. There are following criteria’s are listed below:
- Use Batch Job Exit Status: In this criteria, the batch job exit status is taken for success criteria.
- Search Pattern in output of Batch Program: In this option, the user has to enter the search pattern for the batch program.
- Check Pattern in Log File: In this option the user has to enter the log file name and search pattern for log files.
- Run another command to check status: In this option, the user has to run a command to check the status. The user has to provide the command name.
- Deploy Monitor using Cavisson agent: User can deploy the monitors using Cavisson Agent. The following fields need to be filled in to deploy:
- Tier: In this, the monitors which can be deployed can be viewed. Select the required monitor from the drop-down list.
- Server: Based on the requirement, the user can select any one of the following:
- All: It is used to select all the servers.
- Any: It is used to select any server from the given list.
- Specified: It is used to select specific servers from the given list.