
Overview

This document details the Cavisson machine agent installation process in a Kubernetes environment to monitor infrastructure metrics across your Kubernetes deployment.
Pre-Requisite(s)
- Outbound was connectivity over the 443 port to the Cavisson Controller from the target application where the agent will be deployed.
To get your Cavisson Controller IP/URL, contact your Cavisson Account Representative.
- To download the agent YAML files, ensure that connectivity to the Docker Engine repository: cavissonsystem/cmon_nfagent is present from your Kubernetes environment
Machine Agent Installation
The Cavisson Machine Agent is deployed as a daemonset on the target application cluster. This methodology entails monitoring of all the resources running on the cluster, like namespace, nodes, regions, etc.
There are two methods to deploy the machine agent on your cluster. You can either download the Machine Agent YAML files or you can create these files manually in your Kubernetes environment.
Once these files are either downloaded or created manually, the process to enable the agent is identical. However, detailed steps are mentioned below for both approaches:
Method 1: Downloading the Agent YAML Files
- To download the machine agent file, use the following command to extract the latest YAML files of the machine agent:
wget https://nde.cav-test.com/HUB/kubernetescloud/cmon-config.yaml
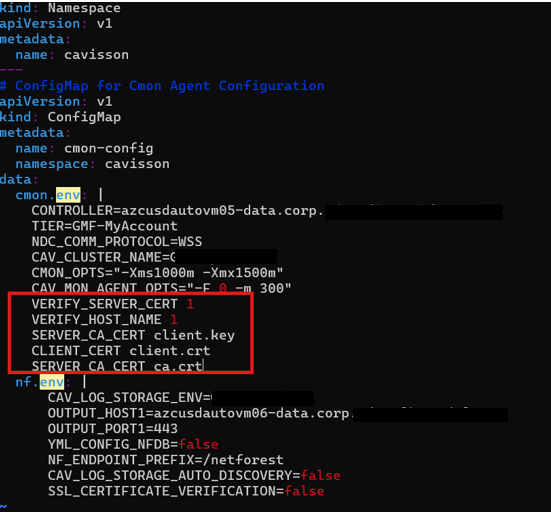
2. Once you have downloaded the above files, change the following parameters in the cmon-config.yaml file:
a) CONTROLLER: Mention the Cavisson Controller IP where the machine agent
will send all Kubernetes infrastructure monitoring data
b) TIER: Mention the name under which the Kubernetes infrastructure metrics will be This name will be visible under the Metrics Tree for analyzing the ingested metrics.
c) CAV_CLUSTER_NAME: Ensure the same name is added as the Tier under this parameter.
A sample cmon-config.yaml file is shared below for reference:
Create ConfigMap
Apply the downloaded cmon-config.yaml via the following command to create a new configMap:
kubectl apply –f cmon-config.yaml
1. Verify the created configmap via the following command:
kubectl describe configMap cmon-config -n cavisson
2. Following is a sample output of the newly created configMap:
Name: cmon-config amespace: cavisson Įabels: <none> Annotations: <none>
Data
====
CAV_CĮUSTER_ AME:
KubeCluster CO TROĮĮER: 66.220.31.146:443
DC_COMM_PROTOCOĮ: WSS
TIER:
KubeCluster
====
Events: <none>
Deploying the Daemonset
1.From the downloaded cmon.yaml file earlier in the process, we will now be deploying the Create the pod where the machine agent will run via the following command:
kubectl apply –f cmon.yaml
2. Verify whether the machine agent (CMON) daemonset is created successfully via the following command:
kubectl get pods -l app=cmon –n cavisson
3.The result should show cmon-xxx pod is The sample output should appear as follows:
kubeadmin@kube-master:~$ kubectl get pods -l app=cmon NAME READY STATUS RESTARTS AGE
cmon-hxpjp 1/1 Running 0 3d22h cmon-pf87q 1/1 Running 0 3d22h cmon-wdjvt 1/1 Running 3 3d22h
4. The machine agent (cmon) pod will automatically start the monitoring of any new node/pod being created in the cluster where you have created the config map and the daemonset.
Method 2: Manually creating the Agent YAML Files
The alternative method to install the Cavisson machine agent is to manually create the following files:
- cmon-yaml
- yaml
Create ConfigMap
- Create a file in your Kubernetes cluster with the name: cmon-yaml
and provide the relevant values for the following parameters:
a) CONTROLLER: Mention the Cavisson Controller IP where the machine agent will send all Kubernetes infrastructure monitoring data
b) TIER: Mention the name under which these metrics will be This name will be visible under the Metrics Tree for analyzing the ingested metrics.
c) CAV_CLUSTER_NAME: Ensure the same name is added as the Tier under this parameter.
2. A sample cmon-config.yaml file is shared below for reference:
# Namespace kind: Namespace apiVersion: v1 metadata:
name: cavisson
—
# ConfigMap for Cmon Agent Configuration apiVersion: v1
kind: ConfigMap metadata:
name: cmon-config namespace:
cavisson data:
CONTROLLER: 10.216.175.12:443
TIER: MyCluster NDC_COMM_PROTOCOL: WSS
CAV_CLUSTER_NAME: MyCluster #should be same as TIER
3. Apply the downloaded cmon-config.yaml via the following command to create a new configMap:
kubectl apply –f cmon-config.yaml
4. Verify the created configmap via the following command
kubectl describe configMap cmon-config -n cavisson
5. Following is a sample output of the newly created configMap:
Name: cmon-config amespace: cavisson Įabels: <none> Annotations: <none>
Data
====
CAV_CĮUSTER_ AME:
MyCluster
CO TROĮĮER: 10.216.175.12:443 DC_COMM_PROTOCOĮ: WSS
TIER:
GMFCluster
BinaryData
====
Events: <none>
Create DaemonSet
- Create a file in your kubernetes cluster with the name as yaml and with the following content:
#Service Account kind: ServiceAccount
apiVersion: v1
metadata:
name: cmon-service-account
namespace: cavisson
—
#Cmon Role
kind: ClusterRole
apiVersion: rbac.authorization.k8s.io/v1
metadata:
name: cmon-role rules:
apiGroups:
-apps
resources:
-pods
-nodes
-deployments
-persistentvolumeclaims
-replicasets
-replicationcontrollers
-daemonsets
-limitranges
verbs:
-get
-list
-watch
apiGroups:
-k8s.io
resources:
-pods
-nodes
-deployments
-persistentvolumeclaims
-replicasets
-replicationcontrollers
-daemonsets
-limitranges
verbs:
-get
-list
-watch
apiGroups:
-“”
resources:
-services
-events
-endpoints
-pods
-nodes
-deployments
-persistentvolumeclaims
-replicasets
-replicationcontrollers
-daemonsets
-limitranges
-nodes/proxy
-nodes/metrics
-nodes/spec
-nodes/stats
-componentstatuses
-resourcequotas
-count/persistentvolumeclaims
-count/services
-count/secrets
-count/configmaps
-count/replicationcontrollers
-count/deployments.apps
-count/replicasets.apps
-count/statefulsets.apps
-count/jobs.batch
-count/cronjobs.batch
-count/deployments.extensions
verbs:
-get
-list
-watch
apiGroups:
-batch
resources:
-cronjobs
-jobs
verbs:
-get
-list
-watch
-delete
-deletecollection
-patch
-update
apiGroups:
-“autoscaling” resources:
-horizontalpodautoscalers verbs:
-list
-watch
apiGroups: # To create the leader election token
- “”
resources:
configmaps verbs:–
-create
-get
-update
nonResourceURLs:
-“/version”
-“/healthz”
-“/metrics”
verbs:
-get
—
#ClusterRoleBinding
apiVersion: rbac.authorization.k8s.io/v1 kind: ClusterRoleBinding
metadata:
name: cmon-clusterrolebinding roleRef:
apiGroup: rbac.authorization.k8s.io kind: ClusterRole
name: cmon-role subjects:
-kind: ServiceAccount
name: cmon-service-account namespace: cavisson
—
#DaemonSet apiVersion: apps/v1 kind: DaemonSet metadata:
name: cmon namespace: cavisson labels:
name: cmon app: cmon
spec:
selector: matchLabels:
name: cmon template:
metadata: labels:
name: cmon app: cmon
spec:
hostPID: true
serviceAccountName: cmon-service-account tolerations:
-key: node-role.kubernetes.io/master effect: NoSchedule
containers:
-name: cmon
image: cavissonsystem/cmon_nfagent:4.14.1.19 imagePullPolicy: IfNotPresent
env:
-name: CONTROLLER
valueFrom: configMapKeyRef:
name: cmon-config key: CONTROLLER
-name: NDC_COMM_PROTOCOL
valueFrom: configMapKeyRef:
name: cmon-config key: NDC_COMM_PROTOCOL
-name: TIER valueFrom:
configMapKeyRef: name: cmon-config key: TIER
-name: CAV_CLUSTER_NAME
valueFrom: configMapKeyRef:
-name: cmon-config key: CAV_CLUSTER_NAME
-name: NODE_IP valueFrom:
fieldRef:
fieldPath: status.hostIP
ports:
– containerPort: 7891
hostPort: 7891 resources:
limits:
cpu: “500m” memory: “1000Mi”
requests: cpu: “500m”
memory: “1000Mi”
volumeMounts:
-name: varlogs mountPath: /var/log
-name: varlibdockercontainers mountPath: /var/lib/docker/containers readOnly: true
-name: hostsys mountPath: /host/sys
-name: hostproc mountPath: /host/proc
-name: varrun mountPath: /var/run
-name: cmon-volume
mountPath: /home/cavisson/monitors/sys/cmon.env subPath: cmon.env
volumes:
-name: varlogs hostPath:
path: /var/log
-name: varlibdockercontainers hostPath:
path: /var/lib/docker/containers
-name: hostsys hostPath:
path: /sys
-name: hostproc hostPath:
path: /proc
-name: varrun hostPath:
path: /var/run
-name: cmon-volume configMap:
-name: cmon-config defaultMode: 440
2. From the created yaml file as per step 1, we will now be deploying the daemonset. Create the pod where the machine agent will run via the following command:
kubectl apply –f cmon.yaml
3. Verify whether the machine agent (cmon) daemonset is created successfully via the following command:
kubectl get pods -l app=cmon –n cavisson
4. The result should show cmon-xxx pod is The sample output should appear as follows:
kubeadmin@kube-master:~$ kubectl get pods -l app=cmon NAME READY STATUS RESTARTS AGE
cmon-hxpjp 1/1 Running 0 3d22h cmon-pf87q 1/1 Running 0 3d22h cmon-wdjvt 1/1 Running 3 3d22h
5. The machine agent (cmon) pod will automatically start the monitoring of any new node/pod being created in the cluster where you have created the config map and the daemonset.